Annotation. A detailed description of the installation of mounts on cross-country skiing. Video at the end of the post. You can download a markup template for installation.
It so happened that my old ski boots under 75 bindings broke. Naturally, I wanted to move to a new level of progress and put modern ski bindings. And just then my son had good extra Salomon boots under SNS mounts. I didn’t have to suffer with the choice of mounts and they were bought for 800 rubles. The exact name is Salomon SNS PROFIL AUTO MEN.
These bindings are marketed as: “Comfortable touring bindings with flex characteristics geared towards male skiers.” Just what the coach ordered.
Because I remembered that I have drills, a drill, an awl and a screwdriver at home, then I politely refused the offer to install fasteners in the store. Moreover, the box contained instructions in 10 languages.
We install ski bindings ourselves.
At home, starting to study the instructions, I found an interesting point:
Mounting installation.
“Your bindings must be properly fitted to your skis by a certified professional at a Salomon Authorized Dealer shop or service center in accordance with the instructions and recommendations of the latest edition of the Salomon Cross Country Technical Manual. Failure to follow this rule increases your risk of injury while riding.“.
That's it, not a word more about installation. I also read from this manual. helpful advice that while fastening on uneven terrain, you should tie the ski to avoid losing it to the right foot or to the left. By the way, very smart.
The rest of the points, as usual, are a complete reinsurance of the manufacturer against various legal claims of a spoiled Western consumer.
Based on the lack of that same manual, I had to recall my carpentry and locksmith skills from labor lessons and install the fasteners myself. Who worked hard at school and then managed to consolidate the skills of marking, drilling and screwdriving in Everyday life he should be able to handle it.
Here is the set of tools we will need. You can use a Phillips screwdriver to drive screws. But it is much better to have a special PZ3 bit at the price of 35-40 rubles. The bit has a blunt tip and fits snugly into the cross of the screw. When driving screws with a conventional Phillips screwdriver, you need to press it well so that it does not slip.

RZ3 bit makes it easier to drive screws

Tool kit for self-installation of fasteners
Our main task is to establish the axis of attachment of the boot to the ski strictly in the center of gravity of the ski. Professionals can move the mounts to one side or the other from the CG. Sunday lovers ski trips there's no point in such frills.
First of all, I dismantled the old 75 mounts. Three holes remained from them, which did not interfere with the installation of SNS mounts.

Find the center of gravity of the ski. To do this, we use a thrust bearing from the mounts themselves. After several unsuccessful attempts, this center will be found. We make a risk with a felt-tip pen.

Using a square, we draw a perpendicular to the side edge of the ski.
Above this line should be located the rod, which is on the sole of the boot.

Draw a perpendicular through the center of gravity
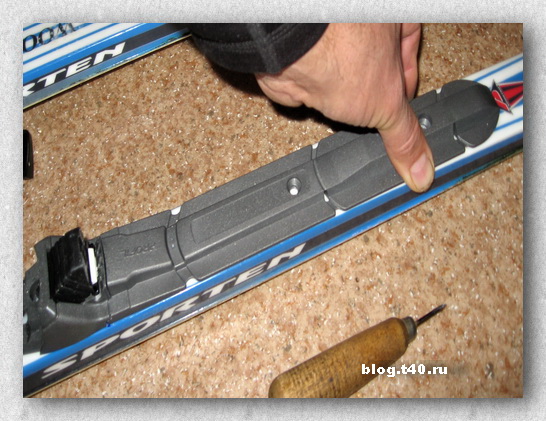
We attach the mount so that the clamping point of the boot rod is above the center of gravity of the ski and carefully prick the center of the front hole with an awl. We do this maneuver very carefully. Once, I put the mount and drilled three holes at once. As a result of inaccurate drilling, the heel of the boot was slightly shifted from the CG and nothing could be corrected.

So now, I decided to drill the front hole in the center first. Screw the mount onto one screw, try on the thrust bearing and then mark the other two holes.
The front hole should be located strictly along the center line of the ski and at a distance of 35 mm from the center of gravity. I already found out this later, having found this markup template from Salamon on the net.
We select a drill. We take a screw from the kit and use a caliper to measure the diameter of the screw shaft.

This is the drill you need to drill the hole with. There are tips to drill with a 3.6 mm drill. http://www.skiline.ru/sport-technology/169-ski-binding-mounting. But somehow risky. A large amount of tightness in the hole can lead to cracking of the ski. According to classical carpentry canons, the diameter of the hole should be equal to the diameter of the screw shaft. I decided to do 50 by 50 and drilled with a 3.8mm bit. In order not to drill the ski through the drill, we focus on the insulating tape.

It is worth first making sure that the length of the screw is not too large and it will not come out from the sliding side of the ski.
We drill a hole, trying very hard to keep the drill perpendicular to the ski. Here a screwdriver or an electric drill is preferable to a hand drill.
When drilling, do not press hard on the drill. Remember that the ski is a layer cake and its filling is not very strong.
We put the mount on the first screw. We attach a pedestal. Carefully align the mount. Holding the front part, remove the thrust bearing and mark two other holes.
Do not latch the front mounting bracket. Just under it is the front screw. In the box, the fasteners lie with the bracket not latched. As a rule, everyone starts to twirl the mount and snaps the bracket.
If the bracket is accidentally latched, then do so. We insert one screwdriver with a rod diameter of 4 mm into the groove where the boot rod is inserted, and with the second screwdriver carefully pry the bracket up. It is better to remove it and put it aside until the end of the installation.

I use screws without glue. The preload in the hole is very good and in my opinion there is no need for glue.
We do the same with the second ski.
In more detail and in dynamics, the installation process of the ski binding is shown in the video. Here I installed SALOMON SNS SKATE mounts for skating for new skis.
Skiing is a great winter activity. Even if you are a fan of the summer heat and beach pastime, you are unlikely to refuse a ski run. And there is no need to talk about those who cannot imagine themselves without this sport. Skiing is becoming more and more popular. Sporting goods stores have the richest assortment of accessories related to it. In this article, we will take a closer look at how to install a ski mount for boots.
A little about sports equipment
The choice of equipment largely depends on the style of skiing: mountain, flat walks or long hikes. In each of these cases, a certain type of ski is needed. If a novice athlete has minimal equipment requirements, then experienced skiers have incomparably higher requirements. When buying equipment, such nuances are taken into account that “dummies” don’t even have a clue about.
The most popular type of skiing is cross-country skiing. The reason is quite clear. A skier needs certain places to ski. And cross-country shoes can also be used for skiing in the forest or city park - as long as the weather is right. In addition to special sportswear, skis and poles, you need to purchase mounts for boots.
Classification
Mounts are important component ski designs. Through the attachment, the force is transferred from the leg to the ski itself. Different models differ in their device, so the question of how to install ski mounts for boots is quite natural.
Important! Older people remember primitive models that could be worn on shoes. There was no mention of convenience. Modern designs have a completely different task - to ensure stability and comfort when walking.
There are 3 types of fasteners:
- Nordic Norm 75mm. These fasteners are also called welt fasteners. This is a morally obsolete model that is gradually losing ground. Fans of such a “retro” and people who are attracted by the low cost of an accessory prevent it from completely abandoning it.
- The NNN system developed by Roteffella is a more recent one. It consists of two longitudinal guides that fix the boots.
- SNS is an innovative, high-level system with a single longitudinal guide. This is the most convenient option. The foot is in full control of the ski. Their cost is higher than NNN, but they win significantly in terms of convenience and practicality.
To mount the fasteners, you can contact the experts. However, it's not that difficult. You can quite cope with this work on your own.
Set of tools
Before attaching ski bindings for boots, prepare the following tools (in addition to the skis themselves, of course):
- Mounts.
- Markup template.
- Ruler and marker for marking.
- Awl.
- Screwdriver.
- PVA glue.
Action algorithm:
- First determine the center of gravity of the skis. Many manufacturing companies apply it immediately, but experienced athletes do not trust this marking, preferring to check it on their own. Use a marker to mark this location.
Important! This precaution is by no means redundant. With the correct determination of the center of gravity, the ride will be comfortable, the ski will not “outweigh” on the sides. The procedure for finding the center of gravity is extremely simple. Set the ski on the edge of the ruler and move until you get "scales" parallel to the lines of the floor. The location of the center of gravity is indicated by a ruler.
- The resulting line coincides with the axis of the fastener. Attach the mount to the surface of the ski, mark the desired position. If you need to fix Nordic Norm 75, then there will be bracket screws on the marked line.
- An important point is to correctly mark the holes. Here they often use a special conductor or a paper template that comes with fasteners.
- The proverb “measure seven times, cut once” works in this case one hundred percent. Before you start drilling, check the distance between the holes on the fasteners and between the markings. Naturally, they must match.
- The most crucial moment is drilling. As a rule, the instructions indicate the depth of the hole to be drilled and the diameter of the drill.
Important! When drilling, the drill should be used at low speeds.
- Blow the drilled holes and fill with glue. Sometimes glue comes with fasteners. If there is no special glue, PVA is fine. The adhesive fills the microcracks formed during drilling, provides a waterproofing effect and improves fixation. However, some athletes argue that glue is completely unnecessary. Solve this question for yourself.
Important! Epoxy should not be used, as the solvent can damage the skis.
- Reattach the binding to the ski cloth and start tightening the screws. At first - not very tightly, to make sure that everything is installed correctly, and then - finally.
Important! For NN 75 bindings, you will have to insert the boot and check how it is centered.
- Now it remains only a little (about 10 hours) to wait until the glue dries completely.
Mounts - important element ski equipment. As a rule, the installation of bindings is done by a store, however, some skiers prefer to do it themselves. Let's find out how they do it.
Types of ski bindings
There are three types of ski bindings:
- Rigid (welted) - Nordic Norm 75 mm.
- Semi-rigid - straps, elastic bands and buckles.
- Systemic:
- SNS Salomon
- NN Rotofella
Since the first two species are gradually falling out of use due to their total imperfection and moral old age, there is no need to talk about them. It is much more interesting to talk about system mounts.
It is worth noting that if the skier decides to install the NN 75mm, the installation instructions below will suit him.
Systems from Salomon and Rotofella
These binding systems have a different number of longitudinal components, functionality and boot stabilization indicators, and are also presented in various modifications. They are great for cross-country skiing - the most common in skiing.
- Rotofella system NNN appeared somewhat later than NN 75mm. The fastening and stabilization of the boots is carried out here, thanks to two longitudinal guides. The functionality of these mounts is not inferior to NN.
- In SNS Salomon only one hinge is used. Due to the nature of the soles of the boots, designed for such bindings, the skier can control the ski, making any move. This is the most modern version of ski bindings.
There are no significant disadvantages or advantages between these systems. They are more convenient, more practical and more modern than their predecessors, so they cost a little more.

How to install bindings on cross-country skis yourself
To install the fasteners, you will first need the following inventory:
- cross-country skis and fastenings on them;
- Paper template for marking or jig;
- Screwdriver (cross bit + drill 3.4 - 3.6 mm);
- Marker;
- PVA glue;
- Ruler;
- Awl.
Installation instructions
Installation of ski bindings takes place in several stages.
Step 1: Center of Gravity
The first step is to determine the center of gravity of the skis. To do this, the ski is installed on the edge of the ruler and moves along this surface until the skis freeze, like balanced scales, parallel to the floor.
The middle lines of balance should be marked with a marker. The marked line will coincide with the axis of the bracket attachment.
Step 2: Markup
The next step is to mark the holes on the ski platform. This action is performed using a paper template, which is usually supplied with the mounts. If it wasn’t on your hands, it doesn’t matter, you can download it from the Internet, or mark the ski with an awl, attaching the assembled mount so that the center of gravity coincides with the axis of fixation of the shoe.

At the same time, in NNN system the holes are located in front of the axis of the center of gravity, and in the SNS the axis lies directly under the mount. For professional marking, a conductor is used.
Step 3: Drill holes
Before drilling, you should check the distance between the holes located on the mount with the distance between the points marked during marking.
Holes for Rottefella are drilled with a drill with a diameter of 3.4 mm, and for Salomon - 3.6 mm. The depth of the holes is 10 mm. Drilling is performed at medium speed with light pressure. To ensure reliable fixation, the finished holes are blown and then filled with glue.
Step 5: Assembly
Now that the holes are ready, you need to attach the fasteners and tighten the screws tightly. After that, the ski is left to dry (about 10-12 hours).
Now cross-country skis are ready for use. As you can see, there is nothing difficult in this. The main thing is to exercise caution and attentiveness, as well as to have all the necessary tools.
ski trips- a favorite form of winter recreation. Even an inveterate lover of a hot summer will not refuse to breathe fresh air in a snowy forest. What can we say about those who cannot imagine their life without skis!
It should be noted that currently skiing in our country actively developing, and the stores offer a wide range of equipment for its different types. Someone prefers ski race, and some, on the contrary, like leisurely walks. There are those for whom the flat terrain seems boring and they ride from the mountains. Mention should also be made of tourists winter hiking by ski.
For all these activities needed different types skiing, and the higher the level of the athlete, the more stringent his equipment requirements. The smallest nuances are taken into account, which beginners and amateurs may not even suspect.
In the existing variety of skis and related sports, everyone can choose the most suitable one for themselves, and ordinary cross-country skiing will surely win the palm.
Still, fans of skiing need to look for places where you can ride, and amateur ski tourism- pleasure for an amateur. But treadmills can be used in the nearest park or forest and do it at least every weekend. Especially gambling can even take part in some local competitions!
So, in order to diversify winter leisure, it is enough to buy the necessary clothes and equipment: skis, poles and bindings. Here it is worth dwelling on them in more detail.
Ski bindings and their types
Mounts- This is a very important element of the ski structure. They transmit forces from the foot to the ski, set the direction of sliding. The older generation probably remembers the models of their grandfather's model: a belt clamp was attached to the ski, which fixed the leg with an elastic band at the back. The only plus of such “inventions” is that they could be worn on any shoes, even on felt boots. And if we compare the described samples with modern ones, then the importance of the role of fasteners will be quite obvious: they provide comfort and stability at any move.
The three main types of cross-country ski bindings are:
Nordic Norm 75mm, or the so-called welt. This is an outdated model that is gradually falling into disuse. Connoisseurs of such antiques and an extremely low price prevent it from finally saying goodbye to it.
NNN system from Roteffella appeared later and has two longitudinal guides that stabilize the boot. In terms of functionality, it is in no way inferior to the previous version.
 SNS system from Salomon, with one longitudinal guide. This is a modern fastening standard high level. The soles of the boots for such bindings allow the foot control the ski at any stroke.
The last two systems are now the most in demand, but there are no obvious advantages or disadvantages compared to each other, so you can choose any. At a price they will cost more than NN75, but they are much more convenient and practical, and save on installation these fasteners. Usually in the instructions it is recommended to seek help from specialists, but such an operation is quite possible to perform on your own. All you need is a little confidence and the right tool:
- Skis and bindings;
- Markup template;
- Screwdriver with a blunt cross bit and drill;
- Ruler;
- Marker;
- PVA glue.
- Awl;
Mounting order
 For all types of bindings, you first need to find the center of gravity of the skis. On some models, the manufacturer has already marked this place, but it is usually advised not to trust the factory branding. Such balancing is necessary for a normal comfortable ride, when the ski does not “outweigh” in any direction. Finding the center of gravity carried out very simply. It is necessary to install the ski on the edge, for example, of a ruler, and move along it until the “scales” freeze parallel to the floor. The ruler in this case will indicate the center of gravity, which will need to be marked with a marker.
So, the desired point is found. At modern models the line of the center of gravity coincides with the axis of the fastening of the bracket for the boot, so you need to attach the front part of the fastening to the ski and mark its correct position with a marker. If it is necessary to install Nordic Norm 75, then two screws of the fastening bracket must be located on the marked line. In other words, it is necessary to place the device so that there is an edge on the equilibrium line thumb legs.
An important step is marking the holes. For him ideal option there will be the use of a special conductor, which allows you to accurately find the position of the fasteners. If there is no such conductor, then a paper template is also suitable, which are usually equipped with fasteners. In the case when it is not there, you will have to mark the ski with an awl through the holes in the mount attached to it. By the way, since the mount consists of elements moving relative to each other, it should be used for marking in assembled form, so that later there is no mismatch in size.

Check for self-control. A drilled ski cannot be restored back, so an extra check will not hurt. Having measured the distance between the holes on the mount, you need to compare them with similar parameters on the finished layout.
Drilling holes according to the marks made. Usually, the instructions indicate how deep the screws need to be drilled, and what length and diameter the drill should be. If there is no suitable length, you can take any and wrap it with electrical tape on top, leaving only the necessary millimeters. Using a drill at low speeds, holes must be drilled in the marked places.
Filling with glue. Blow the finished holes to remove dust, and fill with glue. Sometimes it can come with mounts, but if it is not there, then a simple PVA will do. This will help to fill the cracks formed during drilling, waterproofing and provides a more secure fit. Sometimes it is advised to use epoxy for this purpose, but it is better not to do this, since the solvents in the resin can damage the ski. By the way, there is also an alternative opinion, stating that glue is not needed, but everyone will decide for himself. In any case, it is not difficult to do this, and the glue will not interfere.
Construction assembly. The mount must be re-attached to the ski and start tightening the screws, first not completely, to make sure that the installation is even, and only then finally, so that there are no backlashes. For NN 75, you will first have to insert the boot and check its centering on the ski. Waiting for the glue to dry. After the fasteners are installed, you must wait another 10-12 hours for the glue to dry completely.
This video details how to install the SNS mounts.
Do-it-yourself ski binding installation is doable. The main thing is to have self-confidence and the right tools.
ski trips- a favorite form of winter recreation. Even an inveterate lover of a hot summer will not refuse to breathe fresh air in a snowy forest. What can we say about those who cannot imagine their life without skis!
It should be noted that currently skiing in our country actively developing, and the stores offer a wide range of equipment for its different types. Someone prefers cross-country skiing, and some, on the contrary, like leisurely walks. There are those for whom the flat terrain seems boring and they ride from the mountains. Mention should also be made of tourists making winter skiing trips.
Inserts are one way to reduce the pull on each screw by increasing the bonding surface area in the ski with a larger diameter screw, i.e. an insert. This has the advantage of allowing a machine-threaded screw to be removed and connected hundreds of times without losing structural integrity or joint strength.
The price you pay for using inserts is higher material and labor costs. If you plan on changing bindings more than once using the same holes, inserts are a smart investment. If several times, or because you are worried, you can pull out the bindings in the fall or during the TV show, they are a must. In all cases, if you think you need inserts, you're better off doing it with the original install, not like a repair.
For all these activities need different types of skis, and the higher the level of the athlete, the more stringent his equipment requirements. The smallest nuances are taken into account, which beginners and amateurs may not even suspect.
In the existing variety of skis and related sports, everyone can choose the most suitable one for themselves, and ordinary cross-country skiing will surely win the palm.
There are several types of inserts. They allow the use of the original mounting screw screwed into the helical coil insert. All other inserts work with threaded screws. Brass bushings are good for repairing a worn mounting hole, but are too soft to use when rebinding because the threads can become damaged. In my experience, the increased insert circumference adds the necessary holding power to prevent the binding from being pushed out.
For telemarkers, it is sufficient to use only the inserts on the rear two fixing screws on the cymbal. Ultimately, the benefits certainly outweigh the costs if you're willing to put in the effort. Precise hole placement is critical for inserts. The best way to achieve this is to use a mounting jig. In the absence of this, the reader is advised to exercise extra caution. If the hole is slightly off-center with standard ski core material, error is usually tolerated, and will self-correct to some extent when the mount is secured.
Still, fans of skiing need to look for places where you can ride, and amateur ski tourism is a pleasure for everyone. But treadmills can be used in the nearest park or forest and do it at least every weekend. Especially gambling can even take part in some local competitions!
So, in order to diversify your winter leisure, it is enough to buy the necessary clothes and equipment: skis, poles and bindings. Here it is worth dwelling on them in more detail.
With inserts that accept threaded machine connections between the attachment point and the location of the insert, very little error is allowed. One way to minimize this possibility is to first install the peg with wood screws to make sure all the holes are properly aligned. If so, then the original holes can be reliably expanded for insertion. You can use a simple drill with a tape on it to measure the depth, but it's best to use a step drill so you don't drill too hard.
Ski bindings and their types
Do not buy ski equipment for your child, including ski poles, for growth. Their length should be comfortable and match the height of the skier so that he can easily and freely manipulate them when skiing.
Sources:
- how to choose the right ski poles
Tip 5: How to install ski bindings for skating
When buying new skis, you have to deal with installing mounts on them. In stores, of course, they offer to install mounts for purchased skis but this comes with additional costs. Put mounts yourself - not such a difficult task, the main thing is to carefully calculate all the parameters and follow in detail the instructions attached to the purchased mounts m.

You will need
- - template for marking holes;
- - ruler;
- - marker;
- - drill with a drill;
- - glue;
- - screwdriver.
Instruction
Read the instructions that came with the purchased mounts m. Be guided by it when performing further work. Find the center of gravity skis by placing it on the back of a chair or any other fairly thin object