As a creative being, a person is always trying to give his things an individual style, add features and simply make it more convenient to use. The personal bike is no exception. Tuning is actively gaining momentum and does not bypass anyone: sooner or later, any cyclist will want to add his own flavor, to make the bike not like the others. Some are limited only to additional canopies, others go further and transform the appearance of their two-wheeled transport beyond recognition.
In any case, bike tuning has a place to be, and in the "club" environment, it generally becomes almost a tradition.
It is important to remember one thing: a redesigned bike should look better than before, be more comfortable and not cause an unhealthy smile from colleagues, passers-by or car drivers.
Often, bike tuning is a necessary measure when you need to update an old favorite bike. But even here the effect of "separation from the mass" will not go anywhere. For example, the Soviet signal speed, repainted in bright orange and equipped with new accessories, is hard to miss. Tuning includes changing wheels and tires, changing design features suspension fork, lighting design and more, for which there is enough imagination.
Styling frame, wheels and fork
A simple option for re-registration is great - this is painting it in a different color, which is determined by the supporting structure - the frame. Repainted rims also contribute, provided that the wheels are not replaceable.
Painting a frame is a laborious process, but quite feasible at home. To change the color scheme, you need a little:
- solvent;
- primer;
- sandpaper for cleaning scratches and chips;
- spray cans with paint of the desired color.
The frame is thoroughly washed, the old layer of paint is removed with a solvent. Then, with the help of sandpaper, all defects are evenly sanded. After that, the frame must be degreased and dried.
The primer is a mandatory step before spraying the paint, otherwise it will not last long. The optimal number of layers is up to three, each layer must be allowed to dry. After priming, we proceed to painting the bicycle frame from a spray can. All work is done in a well-ventilated area, drying time - up to two days.
Two tone frame
This frame tuning does not end there. With the help of special stencils, you can add original drawings. Stencils are self-adhesive films with cutouts. You can buy them or make your own. The second option is even better, the main thing is to turn on the fantasy to the maximum.
A separate area is wheel tuning. You can go several ways:
- repainting rims;
- installation of new tires;
- installation of plastic shields or hauling film;
The color of the wheels is the same as the frame. To protect the spokes, a thin film should be glued to each of them and the sleeve must be protected from paint ingress.
Installing tires of a different type is rational on hybrid bikes. So, for example, instead of "average" tires, you can put aggressive rubber from mountain bike. Among home tuning enthusiasts, there are craftsmen who can wrap wheels with a thick colored film or install blades made of plastic or plywood. A radical solution is to put new wheels, better than a fundamentally different design - casting.

Alloy wheels - the original modification of the wheel
Tuning a fork is a purely technical procedure. Modernization of the front shock absorber is:
- changing the length or installing a new spring;
- damper installation;
- removing the shock absorber and converting the fork to a rigid one.
This is done by the owners of bikes on which budget shock absorbers are installed. More advanced types of forks, for example, spring-oil ones, should not be tuned by yourself.
Bright rides in the dark
Lovers of riding dark time days will definitely be interested in light tuning of the bike. A variety of solutions will allow you to turn the bike into a "Christmas tree", attract the attention of passers-by and motorists, and also ensure safety on the move. Varieties of bicycle lighting design:
- installation of the headlight and taillight;
- turning signals;
- frame, steering wheel and wheels with diode tapes;
- pasting with reflectors;
- phosphor lighting.
A bike tuned with front and rear lights is gradually becoming the norm. Everyone knows that driving "in the dark" means not seeing the road yourself and the risk of being unnoticed by the driver of the car. On the highway speed bike the headlight and taillight are mandatory.
Turn signals are a new device in the cycling tuning environment. So far, this device has not been widely used, but the idea is not bad: extending your arm before giving a turn worsens the stability of the bike. Here you just clicked on the button, and other participants traffic warned about the maneuver.

Wireless turn signals with remote control
LED strips, reflectors and phosphor lighting will help make the bike truly attractive. The first option is battery-powered lamp strips. Reflectors transform appearance bicycle only in the light of headlights or street lamps. But phosphorus makes the bike visible in complete darkness! All types of lighting play a key role in the design, but they increase the level of safety when riding in the dark.

LED strips on handlebars, frame and wheels
Separately, it is worth mentioning the tuning of the wheels. Like the frame, they can be pasted over with LED strips, reflective or phosphor stripes. You can go several ways:
- to tune only the rims with light;
- stick LED strips on the knitting needles;
- complete the wheel.
Especially for the wheels, animated records were invented. They are fixed on the spokes and when the wheel rotates, they show bright patterns, stripes and abstractions. Looks amazing, but the batteries only last a few days.

Glowing animator on the wheel
It is unlikely that animators will be able to tune the wheels on their own, so those who prefer tuning a bike with their own hands will choose diodes or luminous strips.
Additional accessories: stylish, comfortable, practical
You can also tune a bike with body kits. Accessories give the bike a special style, some of them play a significant role in the convenience and safety of movement. Common additional items include:
- bell or klaxon;
- rearview mirror;
- trunk and ;
- bottle holder;
- bike computer;
- step.
Most bicycles have a sound device, but if suddenly there is no bell, it's time to put it on. When driving on sidewalks among pedestrians, this is an invaluable thing.
The rear-view mirror allows you to control the situation behind, reduces the "blind zone" of the cyclist. It will come in handy for everyone who rides their bike on the roads.

Put a mirror - added confidence on the roads
Wings are a simple but effective mud protector. They can be put from scratch or replaced with others. So, for example, plastic fenders are widely dispersed as an alternative to metal ones.
A bike rack and a basket will prove useful for road workers who often carry small loads with them. In addition to being useful, these body kits will give the city bike a finished look.
Water is a necessary companion for a cyclist. It is very convenient to fix the bottle with a special holder on a vertical pipe under the saddle. Special capacious flasks are sold with the holders, which are not only more convenient on trips, but will also fit the design of the bike.

You can make a bottle holder with your own hands
A bike computer is a serious element of bike tuning. These compact devices allow you to record speed, distance traveled, travel time and much more.
With a footrest, the problem of putting the bike will be resolved once and for all. If it was already included with the bike, you do not need to remove it. It will definitely come in handy very soon!
A tuned bike (in moderation!) Looks nice and harmonious. It will give a positive mood to its owner, be more convenient and safe, attract the attention of other people and become an example to follow. Before upgrading, you should carefully consider what exactly needs to be improved and find a way to emphasize the main advantages.
A person is a creative person by nature, that's why he tries to give an individual, unique style to each of his things. This process is not ignored by the owners of bicycles - some simply add additional sheds, and many transform their two-wheeled transport almost beyond recognition.
An important principle of bike tuning is not to overdo it. Firstly, it should look better than in the original version and at the same time not lose its specifications. Secondly, you should not tune a bicycle transport so that others openly laugh and marvel at the indefatigable imagination of its owner. To avoid any mistakes when tuning a bike, it is worth knowing the basic principles / rules of this process.
Bicycle frame tuning
You can paint the bike frame yourself at home, but you will need to prepare:
- solvent;
- primer;
- sandpaper (it cleans possible chips and cracks on the frame);
- spray cans with the selected paint color.
Step-by-step instructions for painting a frame at home:

Note:after the frame is painted, you need to wait for the paint to dry completely. As a rule, it takes about 2 days.
Frame tuning does not end there! You can use sticky patterns and apply various images, symbols and even inscriptions to the frame. Patterns can be purchased in specialized stores, or made independently - this is where strictly individual tuning really turns out.
Bicycle wheel tuning

Such a transformation of the bike can be done in several ways:
- paint wheel rims
- change tires;
- install plastic shields;
- wrap the wheels with foil;
- put on new wheels.
Painting the wheels is carried out according to the same principle as painting the frame. The only feature is the protection of the spokes and bushings from the ingress of primer and paint. This can be done with tape or transparent film.
As for the installation of new tires, this idea is relevant for hybrid bicycles, on which, instead of classic tires, the owners put "aggressive" mountain models of two-wheeled vehicles. Fans of home tuning, a sort of local "kulibins" like to drag the wheels with a dense multi-colored film or install plastic / plywood blades. Experts say that in this case, the best option would be a complete replacement of the wheels.
Bicycle fork tuning
This is an exclusively technical modernization of this part of the bike, which implies:

Note:fork tuning should be done only by those cyclists who ride vehicles with budget shock absorbers. If a modern fork of a spring-oil type is installed on a two-wheeled vehicle, then experts categorically do not recommend doing independent tuning. .
Light bike tuning
Fans of cycling at night will certainly be interested in the possibility of light tuning their vehicles. There is such a variety of lighting "chips" for tuning on the market that, if desired, you can turn a bicycle into a "Christmas tree" - this is unlikely to be an indicator of competent light tuning. And what is generally included in the concept of "light tuning of a bicycle"? The types of such tuning include:
- installation of a rear flashlight and a headlight;
- backlighting with diode tapes of the steering wheel, wheels and frame;
- phosphor type backlight;
- installation of turning signals;
- use of reflectors.
 Most often from the entire list, headlights and a taillight are used - these bicycle tuning attributes provide not only the beauty and individuality of the vehicle itself, but also the safety of riding at night. And for driving a two-wheeled vehicle on highways, the installation of a headlight and a taillight is mandatory under current law.
Turn signals are a novelty in the field bicycle tuning but quite practical. Agree, the lunge of the hand in the direction of the proposed turn weakens the stability of the cyclist, and the light signal about the potential maneuver will be noticeable / understandable to other road users, and will not cause inconvenience to the cyclist himself.
Diode tapes can be installed along the entire contour of the bicycle - they will be almost invisible during daylight hours, but they will play an important role in the appearance of cycling and the safety of the cyclist in the evening (at dusk) and at night.
Separately, you need to consider the light tuning of the wheels - you can paste over them with phosphor stripes, diode and / or retroreflective tapes. Experts recommend choosing one way of light tuning bicycle wheels:
- glue only the wheel rims with diode / phosphor / retroreflective tapes;
- use diode tapes for light tuning of spokes;
- use the whole wheel in processing with various light strips.
Note:for light tuning of bicycle wheels, light plates were invented - they are mounted on spokes and, when the wheel rotates, “show” various pictures, multi-colored highlights, abstractions. The spectacle will indeed be amazing, but the batteries will only last a few hours. Tidying the wheels with animation (light) plates can only be done by specialists.
Additional accessories
Bicycle tuning can also be done by installing additional accessories - they will not only change the appearance of two-wheeled vehicles, but also become useful "chips".
In your new project I want to show how from a regular bike you can do it yourself build something extraordinary. The bike will easily transform while riding from a regular bike to a bike with a high handlebar and seat (and vice versa)!

Transformer bike is made of a full suspension mountain bike and a set gas shock absorbers. The spring on the mountain bike was removed to allow the bike to spin freely; the fork and rear triangle of the bike have been lengthened. The gas shocks expand when the bike is in a high position and compress when it returns to a low position.
The general steps for building this type of bike are described below. Special materials and their dimensions will vary depending on the materials available, the type of bike and the body type of the rider.

Step #1: Remove the components from the bike


Bicycle components are removed before cutting and welding.
The connecting rod is removed using a special puller.
For other parts of the structure, standard tools are used (cutters, adjustable wrench, socket / hex keys).
The shock absorbers also need to be removed from the fork.
Step #2: Cutting the Bike

The bike is cut behind the bottom bracket. Use a whetstone to clean up the cut points before welding on the extension piece.
Step #3: Extending the Back Triangle


To lengthen the rear triangle, you can use a piece of square steel pipe about 27 cm long.
Step #4: Fork Extension


To extend the fork, I used two pieces of steel pipe 60 cm long.
Step #5: Which gas shocks to use?


Initially, the distances between potential mounting points on the bike were measured to calculate the possible expansion and contraction lengths for gas shock absorbers. The wheels and seat have been remounted to make the measurement process easier, and the cranks and pedals have also been remounted to ensure they won't make contact with the shocks in any position.
Next, gas shock absorbers were used, the length of which in the expanded state is 94 cm, and in the compressed state 51 cm.
Step #6: How Much Damping Force Do Gas Shocks Use?
The gas shock absorbers used on the bike use a force of 41 kg. With a cyclist weighing 55 kg, the total depreciation force will be at the level of 66%. This is great when riding slowly, but when riding fast over small bumps and potholes in the road, it will compress the bike a little. Locking shock absorbers or higher damping force can help with this problem.
Step #7: Installing the Gas Springs


The upper end of the gas shock absorbers is attached to the center of the triangular part of the bicycle frame near the seat. Gas shock absorbers are supplied with metal flare fittings and 8mm threaded ball studs. An 8mm union nut is welded onto a 6mm diameter steel tube to fit into the triangle, and the resulting structure is then welded to the bike.
The lower end of the gas shock absorbers is attached to a similar steel plate, which is attached to the bike's rear frame mounting holes with screws.
Step #8: Bike Assembly: Chain


The derailleurs were not set back so the bike only has one speed. The rear derailleur was used as a chain tensioner and a small piece of wire was used to lock it in place. Two new chains were connected together to make one big chain.
Step #9: Bike Assembly: Brakes


I used new 2 meter brake cables; the rear cable used existing cable deflectors and tie-downs to hold it in place. The front brake cable used a single tie to hold it in place.
Step #10: Finishing the Project


The bike has been cleaned and repainted; the bike trial pedal was installed on the left side as a step to get on the bike comfortably.
Now you can hit the road on an unusual transforming bike!
Often a bicycle is an expression of the riding style, the emotional state of the cyclist. It turns out that tuning a bike is no less interesting than tuning cars, for example. Therefore, at some point the question arises: “How to upgrade your bike?” “How to make bike tuning at home with your own hands, where to start.”
BICYCLE TUNING AS A CYCLIST'S SELF-EXPRESSION AND STYLE
Those who have made the bicycle an integral part of their lives cannot have the same units. Almost every cyclist adjusts the transport for himself, making it more convenient and unique. Bicycle tuning can be both functional (associated with improving its qualities) and “beauty” (associated with improving its appearance). As a result of such work, the bike may become completely different from its original appearance.
One popular way to personalize your vehicle is LED lighting. They are installed anywhere, but often they are placed in such a way as to highlight the asphalt under the bike, special diodes can also be installed on the nipple caps, which glow while driving.

In turn, this is also a practical point, in terms of lighting some elements of the bike (for example, the backlight of the speedometer allows you to see your speed in the dark, etc.). There are firms that can install more powerful diode lamps, as well as direction indicators, strobe lights, and automatic light switching.

The most practical option for tuning a bike is to upgrade its attachments and its various components. Everything can be improved:
- fork, shock absorbers;
- transmission and shifting;
- wheels (spokes, rims, tires, etc.);
- brake system (rotors, calipers, adapters, etc.);
- control (saddle, pedals, steering wheel, etc.).

Tuning can eat up a significant part of your budget, so you should decide on the main details when replacing equipment, and also should not be done too much. big difference in the equipment class, as the functionality of the entire bike can suffer from this.

Also during tuning, you can add a bike bag, a bike light, a bike computer, a water bottle, fenders, a comfortable seat to your bike. All this will increase the functionality of transport and the comfort of your movement.
BICYCLE TUNING WITH YOUR HANDS: PHOTO-INSTRUCTION
Do-it-yourself bike tuning (photos will be presented below) is an interesting and exciting activity that everyone can do, but you will need to show your imagination and skill, in any case, you can always turn to specialists for help.
Bicycle tuning consists not only in its decoration, but also in the installation of better, more comfortable and reliable components. It can be a replacement of pedals, steering wheel, saddle, brakes.
Today we will tell about the upgrade of the latter, or rather, it will not be the entire brake system, but only the replacement of the brake levers.
It should be remembered that structurally the levers have a similar structure, but the more expensive ones are made from better materials, so they are lighter but more rigid.
Also, high-quality brakes differ in the trajectory of the movement of the brake pads (their translational movement, and not along the arc of a circle). These are brakes like Shimano Deore Lx.
If you still decide to change the brake levers, then you should know that they are different for brake pads - threaded and threadless. Therefore, when buying, you should choose the appropriate type of levers, otherwise you will have to buy new pads.
Now about the installation of levers. Before you start work, you should remove all dirt from the axle of the brakes. You should also clean the holes for the retainer. Now the axle should be greased (a little).

The brake lever is available in a variety of designs, but all of these designs are compatible with front fork and frame mounts. The latch is located near the hole for the axle. The latch is inserted into a special hole for this. The lever has an adjusting screw for the retracting spring.
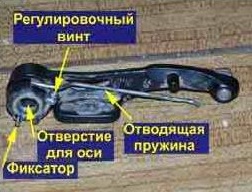
It should also be remembered that the right lever is different from the left lever. The first has screws for attaching the cable, and the second has clamps for the tip of the cable.
Before installing the lever, determine which side it fits. The lever that has the yoke fits the side that has the cable.

Now about the installation. The lever should be put on the axle, and a retainer should be inserted into one of the holes. Start with the average. If you don't like the way the brakes move, just move the lever lock. It should be borne in mind that they should stand in the same position.

Now you should wrap the fixing screw in the axle hole. To tighten the screw, take paint and go over the thread a little. The second brake lever is installed in the same way.

Now let's take the brake pads and install them (if you haven't already). Do not tighten them too much, as they still need to be adjusted. First, install the pads so that they are perpendicular to the rim and the brake levers.

At the same time, if the brake lever is turned, then the pads rest against the side surface of the rim - this is their correct installation.
By following the instructions above, you can effectively install brake pads on your bike.
BIKE TUNING AT HOME
Tuning a bike at home can be quite a simple matter. Painstaking - yes, but simple. You can buy an inexpensive model of a bike and then remake it for yourself and make the bike of your dreams.
In order to upgrade your transport, you need to stock up on patience and tools. So where do you start? To get started, you can install more comfortable and high-quality parts on your bike:
- saddle - more comfortable and suitable for you;
- brakes;
- pedals (replace conventional ones with contact ones);
- install or remove the trunk;
- wheels (or simply replace tires with more functional and suitable for your riding style);
- steering wheel, etc.
Having decided on what you would like to improve technically, you can think about artistic improvement.

At home, you can easily install LED lights on a bike, change ordinary nipples to luminous ones, because each set of such lights has its own simple instructions. LED lighting can be installed anywhere:
- on the spokes of the wheel in the form of various patterns;
- on the steering wheel;
- on the pedals;
- on the frame, etc.

The next step could be painting the bike. It is also not a very complicated procedure, if you approach this process responsibly. It is necessary to qualitatively prepare the bicycle frame before painting:
- everything must be removed from it;
- then you must remove all bumps, stickers (sand out) from it for better work;
- it is desirable to prime the frame;
- after that the frame can be painted.
It will be better to paint the frame from a small spray gun. When painting, it is not recommended to go through the same place more than twice. After you've painted the frame, let it dry for a few days (even if the paint dries quickly). This will allow the paint to set better.

It should be said that bike tuning is more dependent on the cyclist's ability to work with tools. If you are a jack-of-all-trades, then you can completely change the look of a factory bike (by attaching the parts you need to it, which you can do at home). In any case, everything will depend only on your imagination.
BIKE TUNING WITH YOUR HANDS: VIDEO
If you decide that you need a bike tuning and you decide to install LEDs on the wheels of your bike, but don't know how to do it, then this video is for you. You will learn how to make DIY LEDs at home, and how to install them on a wheel. If you carefully follow the tuning instructions, then you will definitely succeed!
When starting to create bicycles with their own hands, craftsmen should evaluate how often and for what purposes they plan to use homemade bicycles. A self-made two-wheeled structure, rather, an experiment, an opportunity to prove to myself: I can do more than others, because I collect vehicle from scratch is hard work. Many parts cannot be made on their own, so you have to run around special stores for such components.
Another important point- to understand very clearly why each bike node is needed, which components cannot be abandoned, otherwise it will suffer or it will not travel more than 2 m.
Components of a homemade bicycle
Frame
If there is a frame left from an old, leaky bicycle, it’s great, the main thing is that it be in good condition and not have rust. If there is no frame, it does not matter either, purchase steel, aluminum or titanium narrow pipes.
The basis is a drawing, which displays all the components of the bike. It is better if the sketch is made in 3D mode on a computer, you can immediately assess the actual dimensions of the necessary parts and get an impression of the proportionality of each. Welding remains the preferred method of connecting functional components, if it is additionally planned to fix the trunk to the frame or, provide recesses for the bolts. Holes are also left for bolts for attachments.

front fork
It's hard to imagine homemade functioning bikes without a front fork. If you plan to ride a bike, sliding down the mountain and climbing up, it is better to build in a soft shock absorber. BMX forks should not be mounted in mountain models - they are too heavy. When making a plug with your own hands, calculate the following parameters:
- fork travel;
- method of fixing the brakes;
- preferred wheel diameter.
Transmission and brake
Transmission nodes are selected based on the amount allocated for this part of the bike. Experts do not advise assembling the chain with your own hands or creating a speed switch, just waste your time, good quality you still won't get it. Arriving at the store, choose a classic transmission, the placental format has a number of significant drawbacks.
They are divided into rim and disc. If cycling is done in dry weather, rim brake pads are suitable, they are inexpensive and greatly facilitate the design. Extreme travel rim brakes will not stand up - equip disc brakes. With the latest, riding safety and comfort for the cyclist are ensured.

The wheels, of course, should be bought ready-made, however, as well as the saddle. Prefer sporty style riding - pay attention to rigid and elastic saddles that take into account the anatomical features of the cyclist.
It would seem that it is easier to choose pedals. Beginners in cycling believe that, apart from the classics, the designers did not come up with anything else, but they are mistaken. Upgraded fittings keep your feet firmly in place so your feet don't slip off so you don't have to make unplanned stops. This also increases the risk of injury on the road.

How to make a bike with a comfortable steering wheel, experts suggest. It must meet the basic requirements:
- ergonomics;
- reliability;
- strength.
The steering wheel is bent according to a pre-made sketch, while do not forget that it has important control components that control the activation of the brakes, knobs that switch speeds, a horn, a headlight. In modern bikes, you can equip an on-board computer.
The steering wheel is fixed to the stem, preferably the last component is adjustable. To assemble the steering wheel, use durable materials that will not let you down: steel, titanium or carbon.

Step-by-step instructions for making a bicycle yourself
Frame creation
How to make a bicycle with your own hands, starting from the frame, craftsmen tell. It is unlikely that you can do the work yourself, so enlist the help of a friend. For the frame, prepare 7 pipes, 2 of them should be short, 4 medium - they are placed for the rear feathers, the long ones remain for the seat component.
Follow this frame assembly sequence:
- Attach the lower main pipe to the bottom bracket using a welding machine.
- It should be fixed to the lower edge of the steering tube located in front of the bike. The position of the helmsman is relative to the perpendicular of the bottom bracket shell.
- Following the parallel of the head tube to the glass, weld the seat tube to the down tube, taking into account the desired angle of inclination.
- Then weld the seat tube and front tube to the main top tube. The front frame is complete.
- Proceed to welding the lower stays to the glass of the carriage. The angle to the seat profile must match the angle of the main bottom.
- Connect the top end of the seatpost to the edge of the seat stays to form the seat stays.

Pressing the fork and making dropouts
The fork is pressed in in a horizontal position. How to make a bicycle yourself with your own hands at the stage of pressing the fork, step by step instructions masters provide:
- Mount bearings.
- Attach the cones to the balls
- Put the washer on the shock absorber rod.
- Tighten the locknuts firmly, but do not over-tighten so as not to break the connection.
- Take a metal plate and cut out some pieces.
- Armed with a jigsaw, make recesses in the details, the size of which should fit the diameter of the wheel axle and fixing nuts.
- The part is welded to the frame, applying the side devoid of holes.
Landing recesses are placed at the same level, otherwise the wheel will not sit on the dropouts. The step between the mounting holes is equal to the tightening of the nuts to the maximum.

Mounting the remaining components
A fully functioning great bike requires the installation of working units on the skeleton. The most difficult thing is to install on your bottom bracket and debug the cranks and pedals. And again, you can’t do without a guide on how to make a bike with your own hands:
- Secure the steering wheel mounted in the shock absorber housing with a bolt. The plug must be well lubricated before starting work.
- Paste seatpost into the pipe vertically and fix it with a metal clamp with a nut.
- Install the carriage into the glass using a squeeze.
- After installing the chain, install the wheels.
Conclusion
Now you have the knowledge of how to make a bicycle with your own hands almost from scratch. The work begins with the creation of a drawing, and after that the idea of the master is gradually being realized. Some components you can make yourself, others are better to buy, so be prepared for expenses. The made bike will become a real attraction of the area, for sure everyone will want to ride on such a device.