In the modern world, sports have lost their former glory among young people. This is due to the fact that most of the time boys and girls spend on their electronic devices. This can be corrected by showing them an alternative by your own example. In some cases, you have to be creative to do this. For example, you can build a hockey goal that will pass the time to good use.
General information
The stick and puck game first appeared in Canada. Over time, the rules and equipment were polished, which made it possible to achieve the current development of this game. In any big city you can find an ice rink or Ice Palace where everyone can improve their skating and hockey skills. This made it possible to erase the seasonal framework and play hockey even in the summer, which allows you not to lose shape. The main requirement for starting this sport is high-quality and reliable equipment, as well as an appropriate ice surface. At self-training hockey rink in winter, you need to make sure that the area where the rink will be flooded has an accurate level, which will not allow participants to get injured.
Drafting a project

Before you buy material and start making hockey goals with your own hands, you need to accurately determine their dimensions and draw up a drawing of the future design. To have the required game skill, it is necessary to build a structure that will be as similar as possible to a professional hockey goal. The latter differ in such dimensions:
- 122 cm is the height;
- 183 cm is the width;
- 112 cm - depth.
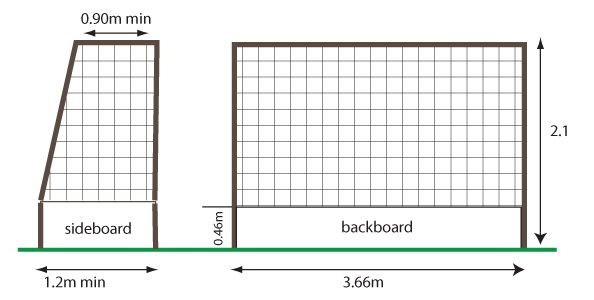
Hockey goal sizes are not quite standard for metric system, which is associated with the country of origin of the sport, where the Imperial number system is used to a greater extent. There will be nothing shameful if the parameters are slightly rounded up or down. A tube with a diameter of 5 cm is used as the basis, which is enough for the strength of the entire structure of the hockey goal. Additionally, the gate design uses a vertical post, which is located in the middle. Its height is 136 cm. The depth mentioned above is indicated for the lower part of the hockey goal. In the upper part, the depth is only 60 cm. The main parameters are shown in the illustration above.
Material selection
When the drawing of the hockey goal frame is ready, you can start choosing the material from which it will be easiest to assemble it. The most common material used for self assembly is wood. The advantage of this material is its ease of processing. With the right approach, without too much difficulty, the planks are easy to give the rounded shape that is required for real gates. Also, the wood has sufficient weight, which will complicate the task of moving the gate on the site. In addition, when hitting wood, the player receives less injury. The disadvantage of this material for assembling hockey goals is exposure to moisture. And there are more than enough of her on the hockey field. To reduce the possibility of deformation, it will be necessary to cover the wood with several layers of paintwork. Due to its softness, wood is also easily damaged when struck.

Another material option that can be considered for assembling hockey goals is polypropylene pipes. Such material is well known to those who are professionally engaged in the installation and replacement of plumbing fixtures and highways, as well as to those who have had to carry out repairs at home. Polypropylene pipes are quite simply interconnected through the use of various fittings. There are options that stick together and those that are soldered with a special soldering iron. In the second case, the connection is more reliable. In terms of assembly speed, polypropylene gates will surpass wooden ones. The gate will be quite strong due to the plasticity of the base. The disadvantage of this solution for hockey goals is the low weight of the goal. It will be difficult to keep them in one place. To offset this disadvantage, you can fill the pipes with some heavy material. Polypropylene is not affected by moisture, so it does not require special maintenance or refinishing.

You can also assemble hockey goals from a standard metal pipe or weld their fittings. The design of the gate in this case will turn out to be quite durable and will stand well on the ice. The disadvantage of this method of assembling hockey goals can be considered the need for the skill of working with a welding machine. In addition, iron, in contact with water, undergoes corrosion, which can quickly destroy both pipes and fittings. Therefore, you will need to constantly monitor the condition of the hockey goal and update the paint on them. Another disadvantage is the high injury risk of such a hockey goal design. If desired, you can make a design of aluminum pipes.
Note! The original design of the hockey goal is made of steel pipes, because only they have the required strength for professional sports.

In addition to the frame important part the gate structure is made up of a grid. If possible, it is better to purchase something as similar as possible to the one used in the original gate design. In some areas, this will be problematic, so you can replace it with what is at hand. Some use strong fishing nets. Others manage to independently weave a network of the required size from natural fiber. If the situation is completely deplorable, then inside the gate you can hang a piece of burlap, which will dampen the flight of the puck. If a net is installed on a hockey structure, then it must be larger than the goal so that the puck does not fly off from it.
Frame assembly

Regardless of what material was chosen for the hockey goal, you will need to prepare the main structural elements. The height was listed above, to provide it, you will need two racks of the above dimensions. You will also need three crossbars, the size of which is equal to the width of the gate. You can assemble the front of the structure for the hockey field. To do this, two racks are connected to the bar. You should end up with an incomplete rectangle. The missing part allows the puck to fly freely into the goal. The prepared structure can be put aside and proceed with the assembly of the second module.

If you try to make the design of the hockey goal easier, then the second module is also assembled in the shape of a rectangle. In addition to the two crossbars that were prepared earlier, you will need two racks, the size of which will be 136 cm. The four parts are interconnected. Now you can combine the two gate modules into a common structure. For this, two parts with a length of 122 cm and two others with a length of 60 cm are cut out. They are fixed to one of the made rectangles for the hockey field. Two long ones are located at the bottom, and two short ones are at the top. After that, a second rectangle is fixed to them. In this case, the front part of the structure for the hockey field must be located strictly vertically, and the back must be at an angle.
Advice! If the structure is assembled from metal pipes, then with a pipe bender, you can repeat the bend of the original hockey structure. In addition, it will be possible to use only one rack, which is mounted on the back.

Another important element, which should not be forgotten when building a frame for a hockey goal, are the stoppers, which are located on the bottom of the frame. They are small spikes. Their task is to keep the hockey goal in one place. They are quite easy to make if welded on lower part small metal bars. If we are talking about a plastic structure, then several self-tapping screws can be screwed through the pipe, which with a sharp part can hold the gate on ice. The process of assembling a hockey goal from metal pipes is shown in detail in the video below.
Grid fixation

Now it's time to fix the grid. It can be done different ways depending on what specific material will be used. If this is indeed a mesh, then it can be fixed with a rope, tying it along its entire length to the front and rear pillars. If we are talking about a canvas that is hung to absorb a blow, then you can fix it to the top crossbar. In the original designs for hockey rinks, an additional rod is used, which is fixed at a short distance from the crossbars and racks. It is to him that the grid is attached. With this approach, it will last longer, because it will be more difficult to fray when the gate is moved.
Additional equipment
Playing hockey is quite traumatic, so you will need to acquire additional protective equipment. It is best to buy a helmet ready-made, because it is impossible to make it without certain skills, but it is quite possible to sew shields for hockey. The first step is to make a pattern of shields according to the parameters of the child's body. For this, paper is most often used, since it is more often to work with it.
The illustration above shows an example of pads that are tied to a hockey player's knees. As you can see, they are a design with pockets in which the protective material is placed. Tubes made of aluminum and its derivatives are used as protection. This choice is due to the fact that the metal is non-toxic, and also has a small weight, which does not bring inconvenience while playing hockey. At the same time, the tubes perfectly protect against blows by the puck on the knees. The shields are based on a cheap fabric that can be folded in several layers to achieve greater strength.
If we are talking about a goalkeeper in hockey, then it is imperative for him to have special gloves that will additionally protect his fingers from damage by the puck. The easiest option would be to use ordinary gloves, on which a piece of foam rubber is sewn. A more complex scheme is shown above in the drawing. It also features a special wrist brace that is also padded and more protective of the joints.
You will also need elbow pads and shoulder pads to play hockey safely. The pattern of the first is shown in the clipping above. As a basis, you can take the given dimensions, but they must be adjusted to suit you so that the protection sits like a glove. Shoulders are made in a similar way. It is necessary to choose a durable fabric, it can be inexpensive. The front and lining parts of the elements of hockey protection are made from it. After that, they are partially stitched together and foam rubber or other porous material is placed inside, which is able to protect against impact. Next, the two parts are sewn together completely. In order for the protection to be more resistant to wear, it is necessary to make a patch of leather on the front. Hockey protection is fixed on the player's body by means of laces or Velcro.
Summary
As you can see, assembling a hockey goal is not particularly difficult if you follow the instructions given. The main requirement that applies to the design of the gate is safety. You can use the gate not only in winter or on the rink. There is an option to play field hockey, so the gates can be set up in the garden and sticks and a special ball can be used for the scheduled game. The requirements for the structure do not change, and the provided pins at the bottom of the structure will be able to fix it well in the ground. It is better to purchase a ready-made hockey stick, because it will be quite problematic to make a design of the required strength on your own. This also applies to pucks.
Spring 1975. The city of Montreal hosted the first ever hockey game, in which gates suitable for this sport were used. From then until today, a game for real men cannot be imagined without such equipment. What is the size of the hockey goal and what are they in general? This article will tell about it.
Varieties
Hockey gate are divided into three types - training, professional and amateur. The first of them is used in order to master the game, hone the skill accurate strikes, develop skills in this sport. In addition, training goals, like amateur ones, are great for non-professional hockey. They can be installed without much difficulty in the yard of the house, on the school playground and in any other suitable places. Training gates are also collapsible. The convenience of this type of hockey equipment is undeniable. They are easy to transport, compact when disassembled and can be installed anywhere there is an ice surface suitable for playing hockey, whether it is indoor ice rink, hockey court or outdoor playground.
Dimensions
Training gates are also called game gates. To date, they can be purchased at sports equipment stores or ordered on the websites of suppliers. The size of the training type hockey goal meets accepted standards. The width is 1.83 meters, and the height from the level of the ice cover is 1.22 meters. It should be noted that these figures carry information about the internal dimensions of the gate. The frame is made of 5 cm. According to the rules, they must be painted bright red. You can buy a gate complete with a grid and a set of extinguishing. Amateur gate parameters - 1.9 m wide and 1.3 m high.
professional gate
They are made in strict accordance with the requirements. The posts and the crossbar must have a diameter of at least 5 cm. The size of the professional type hockey goals is also 1.83 meters wide and 1.22 meters high. On the ice surface, the inventory in question is fixed with the help of special pins. They are removable and usually included in the package. The frame is painted red. Reputable sports equipment manufacturers use a high-quality polymer composition with anti-corrosion properties to coat the steel base. If desired, you can buy a hockey goal along with a damping kit (stuffing). It is designed to soften the impact of the puck on the bar. The normative size of hockey goals is specified in paragraph 130 of the Official Book of Rules of the Ice Hockey Federation.

Today, hockey courts are very popular, where you can practice at any time of the year. They are in almost every city. Of course, hockey goals are an integral part of them. They are installed on any court. The most popular version of this game is ice hockey. What are the dimensions of the goal for this type of ice play? At first glance, if you look at how the goalkeeper protects his object (for clarity, see the photo below), it may seem that the equipment we are describing is somehow small, so much so that it is impossible to score a goal. However, this impression is erroneous. To be convinced of this, it is enough to compare the dimensions of a hockey goal with a puck. All parameters comply with accepted standards: 1.83 m wide and 1.22 m high. The uprights must be at least 5 cm in diameter. Ice hockey goals are equipped with a rounded support frame.

Grid
Hockey goals cannot be imagined without a net. It must be made from durable quality material. For the manufacture of this component, nylon are used and Strength is necessary so that the material can withstand sharp blows from the washer, and is also resistant to external influences, such as humidity and low temperatures. A good mesh will last a long time. The service life should be at least several seasons. The sales kit usually includes 2 nets, which can be with or without protective padding. The mentioned element is attached to the gate with the help of a special tension mechanism, which prevents the mesh from sagging. Such fasteners hold it even at very strong blows during the game. As mentioned above, the standard dimensions of a hockey goal are 1.83 m wide and 1.22 m high. There are other dimensions, which are expressed in numbers 1.9 m and 1.3 m, respectively. Today on sale there are nets for different gates.
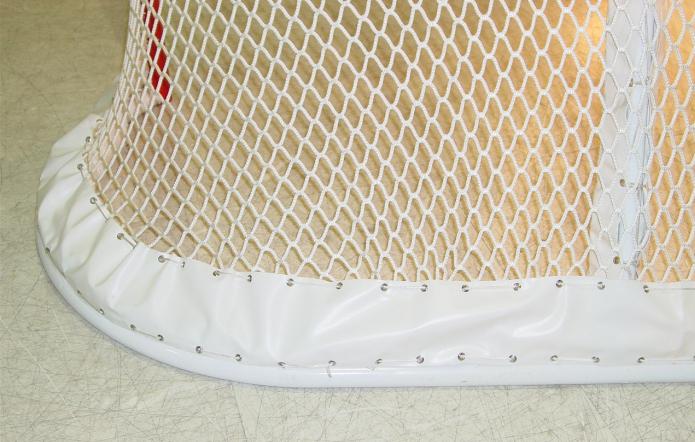
Protective padding
The extinguishing kit is a soft protective material consisting of several three-dimensional layers. This padding can also be purchased separately. The protective set includes six parts: two lower profiles and four fenders - two each for the upper crossbar and for vertical posts. The stuffing is attached to the steel frame of the gate with a rope by means of lacing. It is made of durable PVC fabric and is suitable for both training and professional equipment, exactly matching such a parameter as the size of a hockey goal.
From this article you will learn:
- What is a hockey goal net?
- What are the sizes of the net for hockey goals according to GOST
- How to make a net for a hockey goal with your own hands
- Where to buy ready
Hockey goals are an indispensable element, since it is with their help that the outcome of the game is determined. In addition, for a comfortable and safe match on the hockey field, the hockey goal net must also be of high quality.
Hockey goal net functions and quality requirements

The term "hockey" comes from the English "hockey" or from the old French "hoquet" (which means "shepherd's crook with a hook").
Hockey is a team sport in which players try to hit the puck into the opponent's goal as many times as possible with the help of sticks.
Back in the 16th century, the inhabitants of Holland played a game similar to modern hockey: sticks and a ball were its main attributes. After that, similar games appeared in England and Scandinavia, where in the 19th century they were transformed into bandy on ice.
The birthplace of modern ice hockey is Canada. The natural conditions and climate of this country (numerous reservoirs and long winters) have become a decisive factor for the spread of this sport. However, at first the attribute of the game was not the puck, but heavy ball, and the number of players in teams was several times higher than modern values (up to 50 or more players on each side).
In the 1870s no one sports holiday in Canada could not do without hockey. The creators of the first hockey rules are considered students of McGill University in Montreal. At that time, the role of a hockey goal was performed by two posts, into the space between which the players of both teams tried to throw the puck.
Despite the fact that more than one generation of players have played hockey, the net on the hockey goal appeared only in 1900. And the prerequisite for this was an accident: a puck flying at high speed hit a fan outside the goal. Canadian fisherman Francis Nelson, who was at the match, brought a fishing net and hung it on the gate to prevent such incidents.
In addition to providing safety, the net has become a reliable confirmation of the puck hitting the net. After all, when the puck flew at great speed between two sticks, the goal could not be noticed. In 1945, green and red lights were installed behind the netted hockey goals. Red marked the failure of the goalkeeper, and green confirmed the fact that the goalkeeper was on top.
Thus, the hockey goal net began to perform several functions at once:
- ensure the safety of spectators on the podium;
- dampen puck speed;
- fix a goal.

In modern sports world There are a number of specific requirements for a hockey goal net:
- strength - must withstand numerous blows with the puck;
- wear resistance - a high-quality product can be used for several seasons, even taking into account temperature changes and high humidity;
- the presence of reliable fasteners.
When choosing a net for a hockey goal, you should pay attention to:
- Material type;
- thread thickness;
- Weaving method;
- Size.
The mesh fabric is made of strong threads that are woven from nylon, nylon or polypropylene. The first two materials are considered more durable, but polypropylene is characterized by better resistance to temperature extremes and high humidity. Yarn combinations can also be used to produce hockey goal nets different types, for example, nylon and polypropylene. Most hockey goal nets are white.
Red gate with white mesh
The thickness of the mesh threads for hockey goals can be different: from 2 mm (for amateur games) to 5 mm (for professional competitions). This is due to the fact that non-professional players use the net on the goal much less often and, in addition, have less impact power. If the mesh will be used regularly in training, you should choose threads with a thickness of at least 3 mm.
A professional net for hockey goals is woven in a knotless way, since the knots stretch over time and reduce the strength of the product by almost 30%. Yes and appearance knotless mesh is more attractive. Mesh cells for hockey goals have dimensions of 30x30 or 40x40 mm. Smaller holes are suitable for professional use, while larger cells are suitable for amateur use.
Hockey goal net sizes according to GOST
The dimensions of the mesh must correspond to the data given in table 1 (in mm).
Table 1.

*Minimum value to reduce cut hazard
Now let's move on to the consideration of physical characteristics.


The hockey goal net should not be too tight, otherwise the puck will bounce back when it hits.
The fastening of the net on the goal frame must have arches (pipes) that will protect athletes from getting stuck in body parts and getting injured.
The design of the fastening elements of the net to the goal should also completely exclude the possibility of injuring the players.
All holes and gaps located on the surface of the posts and the crossbars of the goal must have a diameter of at least 8 mm and not more than 25 mm.
Hockey goal net in game (rules)
The rules of the game of hockey have been subjected to various adjustments more than once. Let's say that in the 19th century there were slightly more players on the ice (first 9 on 9, then 7 on 7). The composition of the teams did not provide for the presence of substitute players, and those who were on the field played by very unusual rules. So, the striker had the right to play only at the opponent's goal. The order of introducing the puck into the game also differed from the modern one. The referee put it on the ice, spread his opponents' sticks with his hands and, having given the command, abruptly stepped aside. Only after some time the puck began to be thrown in.
Another interesting point concerned power moves - they could only be used in the defense zone. Fighting all over the field became possible only in 1970. In 1973, they stopped fixing the icing of the puck in the case when the player of the attacking team touched it first. One of the major changes to hockey rules was made in 2001: it consisted in the abolition of the “red line rule”, according to which the player could not take the puck for middle line if it was served from the protection zone. Correction of the rules allows you to make the game even more dynamic and exciting.

Each hockey team consists of six members. One player defends his goal, while the rest try to score a goal for the opposing team. Both teams strive to score as many goals as possible in the opponent's goal. Each puck scored in the goal separates the victory of the opponent by exactly one point.
A hockey match consists of three periods. The standard duration of each is 20 minutes, however, depending on the complexity of the competition, the time may vary.
The game begins with a puck toss. During the service, the representatives of both teams are in the center circle next to each other. Having dropped the puck, the referee starts the timer and starts counting the time until the end of the period. Players on one team have possession of the puck and attempt to score a goal while the opposing team is defending the net or trying to steal the puck.
The rules in hockey, as in football, do not provide for a change of turn, but after each period, goal or penalty in the game, a break begins.
Do-it-yourself hockey goal and net
Before starting work, you need to decide on the material of the hockey goal frame. For these purposes, you can use polypropylene pipes, wooden beams or metal fittings. It should be noted that each material has its own advantages and disadvantages.
Many who want to become owners of a hockey goal use wooden bars to make a frame, since they are easy to find and connect to each other. The main disadvantage of such gates is low wear resistance.
Some people make hockey goal frames out of plastic pipes. However, the plastic construction is too light and will move with each shot on goal. You can weight the plastic frame with sand or fine gravel, which fall asleep inside the pipes.
Metal hockey goals are considered the most durable and reliable, but for their manufacture you will need an additional tool: metal scissors (to give the desired dimensions) and a welding machine (to connect parts).
In addition to the base material for making the frame, you will need a durable hockey goal net and paint.

In order for the do-it-yourself hockey goal to be as close as possible to the original, which is used during sports competitions, you must adhere to certain parameters:
- height - 1.22 m;
- width - 1.83 m;
- depth - 1.12 m.
At the same time, all structural elements of the hockey goal have a diameter of 5 cm. If you make them yourself for amateur games, you can make a slight deviation from the indicated numerical parameters.
The dimensions of all four racks should be the same, unlike the crossbars: the two rear ones are about 1 m, the front one is 1.87 m (according to generally accepted standards). You can change the dimensions of the structure, just remember to respect the proportions.
For reference: to assemble a mini version of the gate for children's games, you can proportionally change the size of the beams.
Having prepared all the necessary materials and tools, assembling a hockey goal with your own hands will not be special work. Do not forget that today on the Internet you can find any training video, including one that will contain step by step instructions performing such work.
Regardless of the material chosen, after the assembly is completed, the structure should acquire a trapezoidal shape. The next stage is equipping the frame with a net for a hockey goal. To do this, drill holes in all its parts. Please note that the net should be stretched from above over the posts and crossbars, and not from the inside.
The final step is painting the hockey goal. Usually it is red and white, since this combination of shades is clearly visible against the background of ice. After the paint has completely dried, you can start training.
In order to prevent the goal from moving on the ice during the game, you can weight it with small weights that are hooked to the bottom bar. More reliable fixation of the gate is provided by special pins that can be mounted in the ice.
Based on the foregoing, we can conclude that it is quite easy to make a hockey goal with your own hands. This design is quite enough for several years, during which you will enjoy your favorite game.
How to weave a net for a hockey goal yourself
You can weave a net for a hockey goal by analogy with fishing net: using a shuttle and an oblong wooden plate for casting on. The width of the plate must correspond to the side of the cell (square). In order to weave a net for a hockey goal on your own, it will take no more than two days.
It is preferable to use nylon cord, but you can take the usual, cotton. In addition, you will need a shuttle, a template and a ring. They are made from wood and wire. The size of the template depends on the parameters of the network cell. Suppose the length of the net for the hockey goal is 2 m, and the cell size is 5 cm. In this case, the template will have the following dimensions: 50–60 cm long and 5 cm wide.
Consider initial stages manufacturing.
The end of the cord wound on the shuttle must be tied with loops. Make sure that the distance between the nodes is the same and equal to 5 cm.

The figures clearly show the movement of the shuttle and the cord. Try to weave the first row, focusing on the presented schematic image. The circle shows where it should be thumb holding cord. The finished network should be attached to the frame with a rubber shock absorber harness.
Where to buy a ready-made net for a hockey goal
If you and your children love to play hockey, you can easily make a gate with your own hands and install it on the yard. ice rink. Having at your disposal your own sport equipment, you will spend as much free time with a stick and a puck as you like. Classes in the fresh frosty air contribute to hardening and comprehensive physical development. You can play not only in a team or in pairs, but also alone. How to make a hockey goal with your own hands, we will tell further.
What you need to make a goal for hockey with your own hands
First you need to decide on the main material: do-it-yourself hockey goals can be made from polypropylene pipes, metal or wood. In industrially manufactured equipment, a profile with a round section is used. In the absence of such, you can make a hockey goal from a wooden beam with your own hands. The main advantage of choosing this material is that the parts are easy to fasten. The disadvantages include lower strength compared to metal. Hockey goals can be made with your own hands from plastic pipes. The design of this material is very light and shifts from the slightest blow. To make it heavier, you can fill the pipes with sand. In addition, to make a goal, you will need a mesh with a small mesh size (enough to hold the puck) and paint.
DIY hockey goal sizes
The standard height of the hockey goal is 122 cm, the length of the lower beam is 187 cm. The rear vertical beams are 134 cm (two side and one in the center). The depth of the gate at the bottom is 110 cm, and at the top it is less - only 40 cm (both of those and other parts need 2 pieces each). The diameter of the metal pipe used for the industrial production of gaming equipment is 5 cm. The dimensions of a hand-made hockey goal may be different. When making equipment for a mini game or for children, you can proportionally change the length of the beams.
How to make a hockey goal with your own hands
If you decide to use metal beams, you will need a special tool, as well as a welding machine. When working with plastic pipes, you can order the required size and number of parts in the store. For connections, special adapters are used. If you use a wooden beam, additionally strengthen all joints with corners. Without this, the structure will not be strong enough to withstand multiple hits from the puck.
If you don't have a ready-made hockey goal net, you can also make your own from household rope, which is durable and suitable for outdoor use. After all the parts are prepared, you need to connect them. Holes are drilled in the finished structure for attaching the mesh. The beams are painted to make the gate stand out against the ice.
In the Sport Ugolok online store, you can order ice hockey goals at any time. We have low prices, long warranty and fast delivery. You can order a gate for games for both children and adults. If you want to save time and money, ready-made sports equipment is the best option for you. The offered gates fully comply with all standards and are suitable for installation on outdoor and indoor skating rinks.
Do-it-yourself football goalIf in your yard or at your dacha there is not yet football goal, you can make them with your own hands. To do this, you will need not so much time, some cash investments, as well as the ability to handle tools. In work, you can use a wooden beam, plastic pipes or metal profile. You can make a football goal net with your own hands or buy it ready-made in a store. With black and white paint, you will give the equipment a finished look and protect it from the weather. |
|