It is customary to analyze the technique of archery according to the following elements: preparation, grip, capture, bow tension, release (descent), breath control, aiming.
fabrication
Leg position
Body position
grip
The position of the hand holding the bow
capture
Bow tension
Release (descent)
Breath control
Aiming
Archery - is the process of doing complex motor action, the main elements of which are the tension of the bow and the release of the bowstring. this optimal how to perform this movement. Each archer has his own shooting technique, since all people differ in physical development, body structure, body weight and other parameters. Technical elements when shooting from a sports classic bow, they differ from the technique of shooting from a compound bow.
MANUFACTURING.
The archer's position is determined by the position of the legs, torso, arms and head of the athlete. Consider each element of the manufacture of the archer separately.
Leg position.
The archer (right-handed) usually stands with his left side to the target. The legs, which are the support for the whole body, because shooting is carried out in a vertical position, must be straightened. The tension of the corresponding muscles creates a minimum of internal degrees of freedom for the lower limbs and the lower part of the body, i.e. movements in all joints (ankle, knee, hip) should be minimal. This is a prerequisite for maintaining balance and reducing vibrations to ensure the immobility of the shooter-weapon system. Naturally, the overstrain of the muscles of the legs and torso is unacceptable, because. this can cause discoordination in the basic movement control system.
The feet are located approximately shoulder-width apart from each other, the socks are slightly turned to the sides. The position of the feet must be constant, not change from shot to shot. It is determined by the location of the characteristic points of the feet (anterior and posterior points of the axis passing through the middle of the heel and the middle of the big toe).
There are three main manufacturing options: open, lateral, closed.
The choice of one or another option depends on the individual characteristics of the archer. These options mainly differ in the position of the body relative to the target line, which is determined primarily by the position of the feet.

The figure shows the position of the legs in open, side and closed types of manufacture.
The most common at present is the lateral manufacture.
All three types of preparation in archery are divided into preliminary and main.
Preliminary preparation consists in performing movements that ensure the correct positioning of the feet relative to each other and the orientation of the body relative to the target line. The head is usually turned slightly towards the target. The bow is either held in the air with the left hand lowered along the body, or the lower shoulder rests on the left foot and is held with the left hand bent at the elbow joint.
The main preparation consists in performing the necessary actions for the shooter to assume a position with a drawn bow up to touching certain (individual) orientation points on the face (chin, nose tip, etc.) with the bowstring.
Body position.
In the preparation of an archer, this position can be estimated by a conditional vertical axis. Depending on individual characteristics, this axis can be located strictly vertically or with a slight forward inclination. With this position of the torso, it is easier to reduce unwanted touch and pressure of the bowstring on the shooter's chest.
 The position of the body must obey the main requirement - to create a biomechanical support and maintain it throughout the entire time of the shot. In this regard, the work of the muscles of the body should be as variable as possible, which requires constant training.
The position of the body is determined by the location of its characteristic points (abdomen, pelvis, as well as the axis passing through the hip joints).
Head position.
The shooter's head is turned to face the target. The muscles of the neck that hold the head upright and are involved in turning the head should not be overly tense. Otherwise, this can disrupt blood flow, lead to excessive tension in the muscles of the body and the arm that performs the bow tension, which, in turn, can cause discoordination of movements and, as a result, the occurrence of errors. The position of the head must be uniform and not change during the course of the shot, otherwise it may adversely affect the quality of aiming. 
The distance between the eyes (the leading eye) and the shank of the arrow must always be constant, so the teeth must be tightly clenched. The points (point) of contact between the bowstring and the face (tip of the nose, middle of the chin, to the right of the face) must be constant.
The lower jaw should be in close contact with top brush and fingertip, because the hand that performs the bow tension moves along the jawbone and the same place of contact serves as a constant reference point for the correct movement of the hand.
The leading eye should be located at a certain (equal) distance from the plane of the shot so that the bowstring does not obscure the front sight.
The position of the hand holding the bow.
The left (usually) hand holding the bow is raised towards the target, straightened and in relation to the axis spinal column approximately at an angle of 90 ° (the change in this angle depends on the shooting distance).
The arm should be straightened and fixed in the wrist, elbow and shoulder joints. This fixation is carried out due to the simultaneous tension of the antagonist muscles for each joint. The hand holding the bow actively resists the increasing pressure of the bow as it is drawn. The hand, forearm, and shoulder, while drawing and holding the drawn bow, must form a rigid system, together with shoulder girdle and head.
Grip.
The position of the hand is determined by the chosen method of holding the bow ( grip). To hold the bow, there are several types of grip, which differ in the location of the palm and fingers on the handle of the bow: low, medium, high.
Each of them has its own advantages and disadvantages. Common to all types of grip is that the bow handle is inserted into the "fork" formed by the thumb and forefinger.

With a low grip, the back of the handle rests tightly against the base of the thumb, and the side fits snugly against the muscles of the palm. The conditional axis of the wrist joint is located at an angle of 45 ° to the plane of the shot. The middle part of the hand is located approximately at an angle of 120 ° to the forearm. With a low grip, the contact area of \u200b\u200bthe palm with the handle is the largest.
With an average grip, the contact area is significantly reduced due to the fact that the hand is straightened, the angle with respect to the forearm is approximately 180 ° and therefore there is almost no bend between the hand and forearm. The base of the thumb and the bottom of the palm do not touch the handle of the bow.
With a high grip, the hand is somewhat lowered in relation to the forearm, and the area of its contact with the bow handle is even more reduced.
The position of the forearm is mainly dictated by the need to ensure the free passage of the bowstring when fired. To do this, the shoulder must be pronated in the shoulder joint so as to create a minimum of forearm surfaces protruding towards the plane of the shot. the articulation of the forearm with the shoulder must be rigid, these two links form a single whole. Due to internal forces, it is necessary to eliminate possible degrees of freedom in the elbow and wrist joints.
Right hand position.
This is the hand that makes capture, retention and release bowstrings, and also participates in bow tension.
Capture.
The archery grip is a way of holding the bowstring and can be deep or medium.

The most common is a deep grip. It is characterized by the fact that the gripping hand is perpendicular to the string (before drawing the bow). The bowstring is grasped with three (sometimes two) fingers in such a way that the load on them is as uniform as possible, and the bowstring itself is located on the extreme bend of the distal phalanges of the fingers (index, middle, ring). The rest of the fingers and palm should be as straight as possible. The thumb and little finger should be as relaxed as possible. With an average grip, the string is located approximately in the middle of the distal phalanges of the fingers. The shank of the arrow is placed between the index and middle fingers and must not touch or pinch when drawing the bow and releasing the arrow. For this purpose, an instep support is installed on the fingertip.
After the grip is completed, the left hand raises the bow, while the right hand, being in a half-bent state, holds the bowstring.
Before the start of tension, the right shoulder and forearm are located in a horizontal plane, while shoulder joint if possible, it should be lowered, the elbow of the right hand is slightly raised in relation to the longitudinal axis of the arrow.
In the sport of compound archery, a special technical device called a release is usually used to grab and hold the bowstring.
In this case, the release, depending on the design, is either held by the fingers of the right hand (T-shaped), or fastened with a leather strap on the forearm (carpal).
Bow pull.
The movement of all links of the right half of the upper limb belt must be coordinated so that the string moves in the plane of the bow. When it is pulled, the position of the fingers on the bowstring and general position brush relative to the plane of the shot should not change.
The tension of the bow is carried out simultaneously by the muscles of the right arm and back. The initial draw phase (first phase) of the bow is carried out mainly by the muscles of the right hand. The middle (second) and especially the final (third) phases of drawing the bow are performed mainly by contracting the back muscles, bringing the shoulder blade to the spine.
The final phase of drawing the bow is the most important. immediately before it begins, the hand involved in the bow tension passes (or is fixed - depending on the type of technique) through certain points of contact located on the face (tip of the nose and middle of the chin or only the chin, etc.). In the event that the brush is fixed under the chin, it has some varieties depending on the position of the fingers: submandibular, maxillary, cervical.

Currently, submandibular fixation is most widespread, when the hand is under the chin, thumb and the little finger are as relaxed as possible. After fixing and refining aiming, the hand continues its movement along the jawbone due to the contraction of the muscles of the back and arm. This movement after the fixation is done is commonly called the “stretch”.
In another version of the technique, the right hand touches the face at the same points (the main thing is that these landmarks are always constant), but does not stop, and as the aiming becomes more precise, it slowly moves back along the jawbone, i.e. the effort to draw the bow does not stop.
During the final phase of drawing the bow, when the hand, under the chin, moves back along the jawbone due to the contraction of the muscles of the arm and back (the main work in this phase should fall on the muscles of the back), the arrow will come out from under the clicker, a click will be heard and release takes place. The main requirement for the final draw phase of the bow is that it must continue without stopping after the clicker click and at the moment the arrow is released.
When a compound bow is drawn, its character changes. this is due to the design features of the weapon (bow). The main effort to perform the draw develops in the initial (first) phase (70% of the draw force of the bow). In the second phase, there is a rather sharp decrease in the magnitude of the force (30% of the bow tension force). When performing the third (final) phase of drawing the bow, the muscle tension is much less than in its first phase. It is approximately 30% of the bow tension force and practically does not change as the hand approaches certain fixation points on the face.
Given these features, it is necessary to pay special attention to the position and work of the hand holding the bow, because. it is subject to increased requirements for maintaining a reliable emphasis on the bow both during the first and during the second phases of its tension.
It should also be noted that in sports shooting from a compound bow using an opener, the right hand in the final phase of the tension, as a rule, is located to the right of the face and touches the right cheek, and is not located under the jawbone; However, the tension of the muscles of the back and arm, performing the tension of the bow during the fixation of the hand and the descent (release) of the bowstring, should be sufficient to hold it, and even its increase should be subjectively felt. This can prevent uncontrolled relaxation of the muscles of the back and arm and the "surrender" of the right arm forward.
The movement of the trigger finger (pressing the release button or the disconnector trigger) must be smooth and autonomous so as not to cause an uncontrolled increase in tension on the muscle groups directly involved in this movement.
Release(descent).
Descent - This is the release of the bowstring from the grip. It is performed during the final phase of drawing the bow. The main requirement for release is instantaneous, simultaneous and complete relaxation of the fingers holding the bowstring. If this condition is met, the bowstring, as it were, opens completely relaxed fingers and leaves them with a minimum deviation from the plane of the shot.

The relaxation of the fingers and the release of the bowstring from the grip occurs at the click of the clicker, however, one must always remember that the tension of the bow after the click of the clicker and at the time of the release should not be interrupted.
In the case of using a release, the fingers of the hand that draws the bow and holds the bowstring are not directly involved in its release. The release in this case can be called a descent, because. depending on the design of the release, the archer presses the thumb or forefinger on a special release button or trigger, which actuates the trigger to release the bowstring.
When using the release, it is possible to achieve a minimum deviation of the bowstring and bow from the plane of the shot, and due to this, the deformation of the arrow is reduced, which ultimately has a positive effect on the accuracy of fire.
Breath control.
When firing a shot, the archer strives for the best stability of the "shooter-weapon" system. For this, it becomes necessary to stop breathing for the duration of its execution, i.e. exclude unwanted movements chest. Hold your breath for 10-15s. is not difficult even for an untrained person. This time is enough to complete the shot. As the bow is pulled and immediately in front of it, breathing becomes more and more shallow and the archer lingers on a natural respiratory pause, and the stop should be at a moment a little less than half an exhalation. This is the most rational and natural cessation of breathing, in which there remains a slight tone of the respiratory muscles, corresponding to the general tone of the body.
The level of oxygen in the blood and its supply in the lungs is quite sufficient for the normal functioning of all body systems for 10-15 seconds. Moreover, as training progresses, the reflex threshold of the urge to inhale moves away with a decrease in oxygen in the blood.
With such a breath hold, the archer does not experience oxygen starvation, i.e. the state of hypoxia does not occur, and therefore there is no need for hyperventilation of the lungs. In the case of hyperventilation of the lungs, an undesirable phenomenon for the archer of oversaturation with blood oxygen can occur, which causes slight dizziness, uncoordination of movements and loss of stability.
Aiming.
The aiming technique consists in pointing and holding the front sight in the aiming area in the center of the target (as a rule). The front sight can be rectangular, trapezoidal, in the form of a point, round and annular. During aiming, the archer mainly sees the sight, bowstring and target. The device of the eye does not allow you to simultaneously see the aiming device, the bowstring and the target equally clearly; three disparate objects. Therefore, the eye is focused in such a way that the front sight is most clearly visible, the target is less clearly, and the bowstring is even less clearly. The bowstring can be to the right or left of the front sight, which is of no fundamental importance. The main requirement is that the bowstring should always be on the same side of the front sight and at the same distance from it.

When aiming with a classic bow, it must be remembered that the hand that performs the bow tension must touch the jawbone and slowly move back due to the contraction of the muscles of the arm and back. The mouth must be tightly closed.
These actions must be controlled, otherwise the distance between the eyes and the arrow may change, which will lead to an error in aiming.
When aiming with a compound bow, as a rule, a level is used to control the position of the bow in the horizontal plane, an optical sight and a pip-site (a special device with a small hole that is attached to the bowstring at the level of the eye involved in aiming). So we can talk about a certain combination of a diopter with an optical sight. When the bow is fully drawn, the shooter's eye, the center of the hole (diopter) of the pip-site, the front sight and the aiming point are in a straight line.
The line formed by the pupil of the eye, the front sight and the aiming point is called aiming line.
target area - is the area of a circle bounded by a circle centered on the aiming point. It can be more or less depending on the degree of stability of the bow position. The higher the skill level of the archer, the smaller the area of fluctuation of the front sight.
The position of the head should provide the most advantageous position of the eyes. The muscles of the neck should never be overstretched, which can lead to discoordination of actions in the final phase of drawing the bow.
Article from the site http://www.archery-sila.ru
12/10/2009 | Archery Basics

First, let's define the terms associated with archery. Let's consider some of them.
stretching- this is the retraction of the bowstring back.

Rice. 1. Stretching the bow.
Full tension- this is the position of the string before the shot, when it is pulled back to the limit (see Fig. 1).
bow power- this is the force required to fully draw to a length of not more than 750 mm for classic bows, or the force required to actuate blocks (eccentrics) for compound bows. Measured in accordance with international competition rules in Lbs (pounds) or in accordance with national Russian standards in kGs (kilogram-force).
String holding force- the force in Lbs or Kgs required to hold the bowstring in full tension. For classic bows, it is equal to the strength of the bow. In block ones - with a decrease of up to 80% of the strength of the bow.
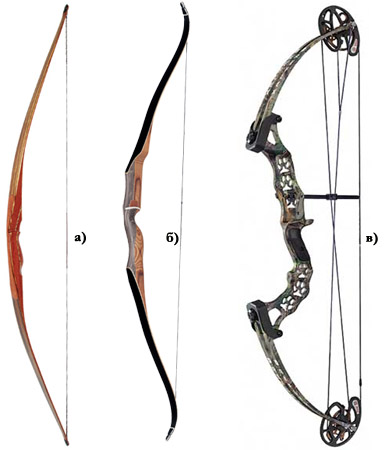
Rice. 2. Types of bows. A. - straight bow; B. - recurve bow; V. - compound bow.
straight bow- a classic bow, the ends of the arc of which are straight (not bent), as a rule, has a span of 1.5 to 2 meters. This is the most primitive bow in design. Shooting with this type of bow requires many years of practice. When shooting from this type of bow, it should be borne in mind that the holding force of the bowstring is equal to the strength of the bow. For example, if the strength of the bow is 40 Lbs (18.16 kgf), then at full string tension you will have to hold the same force with your fingers.
recurve bow- the classic type of bows, the ends of the arc of which are bent in the direction in which the shot is made, this increases the load on the shoulders of the bow when stretching. This design allows, with the same force as a straight bow, to shoot further, more evenly and more accurately (see Fig. 3). However, to learn how to accurately shoot a recurve classic bow, you also need long workouts and years of practice. The strength of the bowstring retention of these bows is also equal to the strength of the bow.

Rice. 3. PSE ARCHERY classic recurve bows with trademarks (from left to right) Buckeye, Impala, Kudu.
compound bows- the type of the most modern bows with a technically advanced design. Currently, compound bows are the most common type of bows in the world, which are widely used in mass sports, recreation and entertainment.
Blocks or eccentrics of the bow give a significant reduction in the scope of the bow (without reducing its strength) and the strength of the bowstring, increase the speed of the arrow. Shooting with these bows is easy to master and allows you to a short time achieve good results in shooting accuracy. Blocks or eccentrics are so named because their axes are off-center. When the bowstring of a compound bow is pulled, the pulleys fire and transfer part of the load needed to hold the bowstring to special cables. Due to the redistribution of forces from the bowstring to the cables, there is a significant decrease in the strength of its retention, which is called the force of the block, therefore the force of holding the bowstring of a compound bow in a taut state is significantly lower than the strength of the bow. Block strength is measured as a percentage of the bow's strength. There are blocks with a force of 80%, i.e. with a bow strength of 40 Lbs (18.16 kgf), the holding force of the bowstring of such a bow will be only 8 Lbs, or about 4 kgf! Due to this significant reduction in string holding force, it is much easier to shoot with a compound bow than with classic bows. A lower holding force leaves more time for aiming and accurate shot execution, allows you to shoot for a longer time, because. the hands of the shooter get tired much less.
Consider various designs blocks and their combinations.
round blocks- facilitate shooting, give the greatest accuracy, but provide the lowest reduction in holding force and the lowest arrow flight speed when shooting from compound bows.
Cam blocks- provide a high degree of holding force reduction (10-15% more than round blocks) and high shot speed due to their decentered design, but give less accuracy. In this regard, many models of compound bows use a compromise design with one round block and a second eccentric, which allows to reduce the influence of the negative properties of each of the individual designs (see Fig. 4).
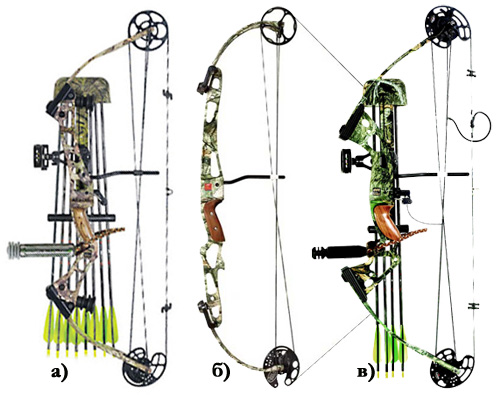
Rice. 4. PSE ARCHERY compound bows with trademarks (from left to right) Scorpion, Shark and Triton.
Name of the parts of the bow:
The main energy of the shot is produced bow shoulders.
The part of the bow that the arrow rests on is called shelf.
The central part of the bow is called handle, which you hold the bow.
The handle comes in three types of designs: concave, straight and curved.
The concave handle is concave towards the shooter, like the letter - C.
The curved handle is curved away from the shooter, like the letter - E.
Straight handle, respectively, straight.
Three-dimensional target shooters (plastic figures of various animals) and hunters prefer concave handles. They provide a higher arrow flight speed, but are more demanding on shooting technique.
Curved handles are more often used by athletes, since such handles are more "tolerant" to errors in aiming.
Drawbows and compound bows have a place where the limbs attach to the handle, called the shoulder mount.
1. SELECTION OF THE BOW.
Determining the dominant eye
One of the most important parameters for choosing a bow is determining your leading eye. Every person has a leading eye - this is the eye with which you will aim.
To determine which of your eyes is leading, you should put your palms together with your thumbs apart so that a triangular gap forms between them. Raise your arms in front of you so that an object is visible in the center of the gap formed. After you "aim" at this object, close your left eye. If the object is still visible through the light, your leading eye is right and you should use a right-handed bow (in the bow article this circumstance is marked with the letter "R", in which case the bowstring is pulled right hand, and the bow handle is held by the left).
If the object moves out of sight, open your left eye and close your right. If the object remains in sight, your dominant eye is the left one, and you should purchase a left-handed bow (in the bow article, this is indicated by the Latin letter “L”, in this case the bowstring is pulled with the left hand, and the bow handle is held with the right).
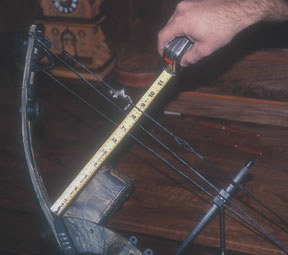
Determining the length of the string tension
Pull length- another important individual parameter for the selection of onions. It mainly depends on the growth of the shooter. The draw length is entered in the form of a special numerical designation in the bow article, which facilitates its correct selection.
In bows produced by the PSE ARCHERY brand, this parameter is indicated by a specific number in inches, for example 29 ”(or 737 mm; 1 inch \u003d 25.4 mm). A bow with a specific brand name, such as "SHARK" with a strength of 44 Lbs, can be produced with a draw length from 26 to 31”, i.e. the article can contain the numbers 26, 27, 28, 29, 30, 31. Thus, the shooter can choose the bow that suits him in terms of draw length.
In bows manufactured by the BROWNING ARCHERY brand, this parameter is indicated in the form of two two-digit numbers indicating the limits of the interval in which the draw length of the bow can be adjusted, for example, on the bow of the F5 TORNADO ™ bow article 0419 BU 2430 50 s with a bow strength of 44 Lbs this range is from 24 to 30 inches (610 - 762 mm).
There are two ways to determine the length of bowstring length appropriate for your height:
Set the arrow on the bow, stretch it and make a mark on the arrow in inches (25.4 mm) from the front edge of the shelf. Then measure the distance from the arrow shank to this mark - this will be your bow draw length. In specialized stores for these purposes, there are special arrows with measuring markings in inches;
Another way is to fold your left hand if you are right-handed, or your right hand if you are left-handed, make a fist and extend it forward so that the fist touches the surface of the wall. Then press the right (or left) hand bent at the elbow, respectively, to the corner of the mouth, as when pulling a bowstring. Have someone measure the distance from the corner of your mouth to the wall. Don't forget to convert this value to inches by dividing the result in millimeters by 25.4, which will be the draw length of the bow that corresponds to you.
The blocks on most bows allow you to adjust the draw length in one inch increments, some in 0.5 inch increments. PSE ARCHERY branded bows require a special press to adjust draw length, while BROWNING ARCHERY branded bows require no adjustment.
For adult shooters, it is recommended that you select your bow so that your draw length matches the draw length indicated in the article, or is in the middle of the indicated range. This will allow you to adjust this bow parameter if necessary.
For children and teenagers, it is better to choose such a bow, the lower limit of the draw length of which is equal to the length of the bow draw required by the shooter at the time of acquiring the bow, this will allow for some time to adjust it as the shooter grows.
Recurve and straight bows do not have a specific draw length. Such bows, in principle, can be stretched to any length up to their destruction. The maximum length of tension is considered to be 28-29 inches (no more than 750 mm).
Determination of the optimal strength of the bow.
The next important parameter is your optimal draw weight, or the strength of the bow that you can draw without exerting too much force. Try several times in a row to stretch different bows with a force of 25 to 44 Lbs (in the future, with changes in legislation and forensic requirements, this limit will increase to 60 Lbs). You will quickly find a bow that you don't have to use too much force to draw, and that you can use to aim and shoot with ease, all of which you can do repeatedly.
Remember the rule! You should only choose a bow that you do not have to exert too much effort to draw, from which shooting is comfortable and gives you pleasure. Do not try to draw a bow too tight for you, this can lead to injury.
On compound bows, the strength of the bow is measured at peak (maximum) force at the draw length at which the cams of the blocks are triggered to facilitate holding the bowstring.
The maximum strength of recurve and straight classic bows is measured by the manufacturer at a draw length of 28-29 inches (no more than 710-750 mm). In accordance with the requirements of the Russian national standard GOST R 52115-2003 " Thrown weapons. Sports bows, bows for recreation and entertainment and arrows for them. General technical requirements. Safety Test Methods” the strength of such bows is measured in accordance with Figure 1 and Table 1, it is the results of such measurements carried out during forensic tests that are entered into the information sheet of the ECC of the Ministry of Internal Affairs of Russia, and then into the certificate of the bow, as the value of its strength.

Rice. 5. Measurement of the strength of classic (straight and recurve) bows in accordance with the national standard GOST R 52115-2003 “Throwing weapons. Sports bows, bows for recreation and entertainment and arrows for them. General technical requirements. Safety Test Methods".
Table 1
| Span of bow arcs (B) in mm | Stretch length (L) when determining the strength of the bow in mm (no more) | Sports Bow Strength (P) >= 44 Lbs (196 H or 20 kgf) (maximum - 60 Lbs, 294 N or 27.24 kgf) | Recreational Bow Power (P) < 45 Lbs (196 Н или 20 кгс) |
| 750 (29”) | Measurement result | Measurement result |
|
| 650 (26”) | Measurement result | Measurement result |
|
| 500 (20”) | Measurement result | Measurement result |
|
| 350 (14”) | Measurement result | Measurement result |
The choice of bow is also influenced by the type of shooting you are going to do. It could be sports shooting on shield targets; shooting at voluminous targets, simulating hunting; simply sports recreation and entertainment in the country, or all of this together. Therefore, depending on the choice, you will need either a sport recurve bow, or a straight classic, or a versatile compound bow.
2. PREPARATION OF THE ONION.
So, the choice of the bow has been made, and now you need to customize it for yourself and for the desired type of arrows.
Shelf selection
For a novice archer, choosing a shelf can be quite a difficult task. It is best to rely on the advice of professionals from the consulting center or shops.
If you are a beginner shooter, we advise you to choose the easiest option. The shelf should also be wide enough. This is important, because beginner archers do not draw the bow very accurately, and with narrow shelf the arrow may jump. This greatly interferes with the process of learning to shoot.
There are also shelf extensions. The extension brings the shelf closer to the shooter, allowing shorter, lighter arrows to be used. Short arrows develop great speed, which is very much appreciated by shooters on three-dimensional targets that simulate hunting. Higher arrow speed corrects aiming errors. However, using a shelf extension requires good shooting technique. Also, for safety reasons, the extension should be selected for a specific type of arrow. In this regard, shelf extensions are not recommended for beginner archers.
Centering
Issue of string. Before setting up, you should decide on the ways to release the bowstring.
There are two ways to release the bowstring. The traditional method with the help of fingers, and technically more advanced - with the help of a mechanical device, the so-called. disconnector or release.
Archers who practice manual release of the bowstring use special fingertips or gloves, which also contribute to a more even descent of the bowstring, in which it slides smoothly over the leather surface. With manual release, it is important to relax the fingers in the same way each time. This is not easy to achieve, so the manual method is less reliable than the mechanical one.
Using a release is the most stable and accurate method of releasing a bowstring. The release works similarly to a crossbow trigger. The release has a trigger button for the thumb or forefinger, which activates the mechanism that releases the bowstring.
Shelf centering
Centering is the adjustment of the position of the shelf, eliminating the defects in the flight of the arrow.
Centering for manual release and breaker (release) will be different.
To center, put the arrow shank on the bowstring and place it on the shelf. Hold the bow in front of you so that the arrow lies in the plane of the bow.
If you are using a breaker (release), when adjusting the position of the shelf, make sure that the line of the bowstring exactly matches the line of the arrow, and is also strictly parallel to the side edge of the shelf. You will achieve more accurate centering later when you do a paper test.
If you prefer a manual release of the string, you should center the shelf one arrow thickness outward from the line of the string (the plane of the bow). Again, more precise settings are made according to the results of the paper test.
Arrow selection
First, consider the parts of the arrow, which are called "feathering" and "tail".
Plumage the arrow consists of 3 or 4 thin plates or "feathers" that act as stabilizers in flight. Arrows with three plates usually have one "feather" highlighted in a different color, for uniform placement of the arrow on the bowstring.
Shank- this is the end of the arrow, with which it is mounted on the bowstring.
Proper selection of arrows for a bow is a key component of successful shooting. The use of correctly selected projectiles plays a huge role, and an arrow that does not match the bow can even be dangerous for the shooter and others.
When selecting Carbon Force Arrows for PSE bows, you need to know the bow strength and draw length (see Table 2). The arrows of this company are conditionally divided into four sizes: 100, 200, 300 and 400. In order to select the necessary arrows, in the right column of the table, determine the line with the strength corresponding to your bow (suppose - 40 Lbs), and in the top line find the column with appropriate for your draw length (e.g. 29 inches). At the intersection of these lines, the table shows a red circle, which corresponds to the index of arrows - 200. Therefore, you can safely purchase arrows of the specified size. The corresponding marking is also on the shaft of arrows.
table 2

The conventional size of the arrows of the company with the trademark "Carbon Force Arrows" corresponds to their specific weight per 1 inch of arrow length in grains (1 grain = 0.0648 grams), so with a size 100 - each inch of arrow length should weigh 6.3 grains (or 0, 41 gr.); at 200 - 6.7 grains (or 0.44 gr.); at 300 - 7.8 grains (or 0.51 gr.); at 400 - 8.9 grains (or 0.58 grams). Camouflaged arrows weigh 1 grain (0.0648 gr.) more per inch of length than regular arrows.
For the correct selection of arrows from other manufacturers, you should use a special table of arrows for bows (see table 3), which shows their correspondence to the dimensions of Carbon Force Arrows arrows. The bottom line shows the weight of the arrows different sizes 29 inches long in grains. In the column on the left is the amount of deflection in inches. The boom deflection (spine) is determined as follows. The boom is placed on two supports, the distance between which is 28 inches (711 mm) in the center of this segment of the body of the arrow, a weight of 88 grams is suspended. The maximum deflection from the horizontal position of the boom is fixed. This will be an indicator of the amount of deflection or the stiffness of the arrow.
According to these parameters, the table contains the articles of arrows with indices 100, 200, 300, 400, "CF XLS Hunter" and "CF Equalizer" (more powerful hunting arrows, exceeding in their parameters arrows with index 400) of the company with the trademark "Carbon Force Arrows" and their corresponding arrows from other companies.
Table 3

Additional settings
Nest installation. The arrow socket is the place on the bowstring where the arrow shank is set. Before installing the socket, you need to make sure that the limbs of the bow are symmetrical relative to the handle. This is checked by measuring the distances from the shoulder attachments to the bowstring (tiller measurement). The distance to the string should be the same for both shoulders. If the limbs of the bow are not level, adjust their position with the fixing screws. Keep in mind that changes in the position of the limbs of the bow affect its strength. It should be remembered that when adjusting the position of the shoulders, for safety reasons, the fixing screws must not be unscrewed more than four full turns.
Rice. 6. Checking the symmetry of the shoulders.
The boom socket is installed using special clamps. It can be a round metal clip or just a piece of thread tied to a bowstring.
To use the release on the bowstring, a special trigger loop is made in the place of the nest. For the loop, a nylon cord is used tied to the bowstring, to which the release clip is subsequently attached. The advantage of the noose is that the string above and below the arrow is evenly stretched. The loop is also easier to move along the string when tuning the bow. In addition, the bowstring wears out less.

Rice. 7. Trigger loop on the bowstring.
To install the arrow socket, it is better to use a special angle ruler. Some archers do eye socket placement, but this is not desirable. Using an angled ruler, set the socket 1/8 inch (about 3.2mm) above the start of it. A more precise position of the socket will be determined after a paper test, so it is best to leave the clamps fully loose.
You can install another additional clip above the first one to secure its position more securely. The arrow socket is ready. We also recommend installing another additional clamp below the main one. Place the arrow shank on the string near the main socket clamp and adjust the lower additional clamp to its thickness with a small gap. Don't push the bottom clamp too hard on the arrow or the arrow will get stuck when the string is fully extended.
Stabilizer installation. Another important detail of the bow is the stabilizer. The stabilizer is needed to dampen the vibration of the shot. It also helps to hold the bow more evenly when aiming, which improves the accuracy of shots. Stabilizers vary in length from 4 to 36 inches (102-915 mm). Which stabilizer you need depends on the type of archery you choose. Long stabilizers are mainly used in sports shooting. For recreation and entertainment, as well as for hunting, you can use short stabilizers, because. they are less bulky and do not interfere with the archer's movement. The stabilizer is screwed into a special hole on the bow handle. In addition to these, PSE produces effective stabilizers that are attached directly to the limbs of the bow and on the bowstring.
Sight installation. Next, you need to install a sight on the bow. There are a great many of them. Archers involved in sports shooting prefer movable types of sights. Those who shoot a bow in nature for recreation and entertainment, as well as hunters - on the contrary, choose fixed dot sights. In addition, there are optical, illuminated dot sights, reticle and many other sights.
To install the sight, you must take the following steps.
Most sights have a built-in level in their design, which allows you to check the accuracy of the sight. To adjust the level of the bow, you must use another level, with which you must set the scope strictly perpendicular to the plane of the bow. The scope level will then show you how level you are holding the bow.
Diopter or pip site- another device for aiming. The scope creates a fixed aiming point, similar to the front sight of a gun. Having a pip site makes aiming much easier. Hunting pip-sites are usually made larger in diameter to make it easier to aim in poor visibility conditions.
The peep site should be set about 4 inches (102 mm) above the boom socket, more precise position can be adjusted later. Secure the pip site with nylon thread. Cut off about 200 mm of nylon thread. You can lubricate it with wax to facilitate the process. Tie a simple knot outside bowstrings, and then on the inside. Make 6 such knots above and below the bowstring. The last node must be secure, so make it a double node. Cut off the excess thread, leaving the ends 15 mm long. Gently melt the ends into a knot with a lighter or match, being careful not to scorch the bowstring.
Then a similar procedure should be repeated under the pip site. When you're done, drag the resulting nodes to the top and bottom of the pip site so that it snaps into place.
Now you should check if you can see the target through the pip site. When you draw the bow, the pip-site rotates until the bow is at full draw. If the pip site keeps spinning at full draw and you can't see through it, additional fixing cables can be added. These cables are often used by hunters to ensure that the pip site is always in the correct position. Installation instructions are included with the fixing cables.
3. SHOOTING TECHNIQUE
It is important to understand that, theoretically, correct setting bow and the correct choice of arrows, all shots must be the same. However, it is clear that the reason for the deviation of the arrows from the target is the archer himself, namely the technique of his shooting. A well-honed shooting technique brought to automaticity is the basis for stable accurate shooting. It is better to learn how to shoot correctly right away than to correct ingrained mistakes later.
Rack
The first step to good technique is practicing the correct stance. There are three main racks:
closed rack;
side stand;
open rack.
In a closed stance, the legs are shoulder-width apart, the hand with the bow is aligned with the target. The right leg is slightly laid back so that the shooter is partially turned with his back to the target. The closed stance is the least comfortable of the three, as it requires a strong head turn towards the target. In addition, in this position, the bowstring, when released, can hit the shooter's shoulder or arm. Therefore, this stance is the least common among athletes. To avoid injuries, shooters, regardless of the stance, use special protective shoulder pads, bibs and leggings.
With a side stance, the legs are also shoulder-width apart, but also on the same line. This allows you to align the body along the line of the shot. Body weight is partially transferred to left leg, turn of the head is natural. Such a stance is much more convenient than a closed one and the probability of hitting the arm with a bowstring is not so high. This stand is preferred by professionals.
The open stance is determined by the position of the legs, which are also shoulder-width apart, but the right leg is extended forward, the toes of the feet are at an angle of 45 ° to the line of the shot. This is a favorite stance for beginners, because. it leaves more freedom to the hand with the bow, the string does not fall on the hand, and the target is best seen.
grip
The next component of the technique is the position of the hand holding the bow on the hilt or grip. There are also three types of grip:
short;
average;
tall.
Most PSE handles offer a low grip. With a low grip, the load on the hand is minimal, this allows you to aim longer and more accurately. Therefore, a low grip is most common among athletes, especially beginners.
Regardless of the grip method, the way to hold the bow is basically the same. Actually holding the bow is not required. The handle itself should only rest on the space between the thumb and forefinger of the holding hand. This point on the arm bears the weight of the bow as it is drawn. The remaining fingers of the hand should only loosely cover the handle. If you forcefully hold or squeeze the handle, a swing will occur, which will immediately affect the accuracy of the shots.
Many shooters do not even cover their hands, leaving their fingers open during the shot. Therefore, in order not to accidentally drop the bow after shooting, most professional archers use a special bow strap, which we recommend that you do too.
Many bows made by PSE have adjustable grips. This pad is designed to move to the left or right.
Installing the arrow and pulling the bowstring
The next stage of preparation for the shot is the installation of the arrow. Having chosen a stance and grip, hold the bow in front of you and take an arrow. Place the arrow on the string without touching the shelf with the plumage. Thread the string through the cut in the arrow shank and place the arrow body (or shaft) on the shelf.
The next step is to apply the brush to the bowstring. For manual descent, use the index, middle and ring fingers. The index finger should be above the arrow, the middle and ring fingers below it.

Rice. 8. Manual descent of the bowstring.

Fig. 9. Lowering the bowstring with a release.
While you are a beginner shooter, try to fully grip the bowstring with your front knuckles. With experience comes the ability to take the bowstring only with the very tips of the fingers for a clearer release. The bowstring must be hooked with your fingers like a hook, and not squeezed in your fingers.
If you are using a mechanical release, use the release to hook the trigger loop or string under the arrow socket. You are now ready to draw the bow.
Stretching the bowstring
Holding the string with your fingers or release, raise the bow towards the target. As you do so, lift your right elbow (or left, depending on which arm you're pulling), keeping it parallel to the ground. It is very important that the arms, shoulders and arrow line up. As you draw the bow, imagine that you are squeezing something on your back between your shoulder blades. Gently twist your left (or right) elbow. This is necessary so that your hand does not fall under the bowstring. Make sure to evenly pull the bowstring back. If you rotate the right (left) hand or squeeze the bowstring, the arrow may come off the shelf.
Base
For good shooting technique it is very important to develop the so-called base of the shooter. Base points determine aiming and draw length. Even small deviations from these points will cause misses.
base point- this is the natural position of the right (or left - for a left-hander) hand near the face, which invariably repeats from shot to shot. To determine your base, you need to draw the bow with your eyes closed and find the memorable points of contact between the hand and the face.
Rice. 10. Basic points.
For the base to be stable, three base points must be determined.
Such first base point there may be contact between the bones of the face and hand. For example, some point on the jaw, where the knuckle of the finger fits comfortably.
Shooters practicing manual escapement usually consider the tip of the index finger pressed against the corner of the mouth as the base point. This technique goes back to the days of shooting without sights. This method allows you to aim at the arrow shaft. A low base point can be selected, for example, when manually descending, the base point under the jaw allows the use of the scope.
Reliable second base point you can make a point of contact with the bowstring of the tip of the nose or chin.
Try to draw the bow several times with your eyes closed to find comfortable, clear and reproducible base points.
If you use a peep site, try stringing a bow and look through a peep site. If it is not at the right height, move it so that it is exactly opposite the eye. The pip site will be the third point of your base.
Aiming
While aiming, align the pip-site reticle with the reticle and target. Aim quickly enough, as you will not be able to keep the bow in a taut state motionless for a long time. This is especially true for classic straight and recurve bows, where the force of holding the bowstring is equal to the strength of the bow.
If you are shooting without a pip site, move your scope slightly to the left or right of the string and align it with the target. Once you've chosen a scope offset from the string, stick to it all the time to get used to it, otherwise the arrows will go to the right or left of the target.
Now that you have mastered the technique of shooting, you can start fine-tuning the scope.
Basic rule of adjustment: move the sight according to the deviation middle point hits.
This means that if the arrows hit:
Above and to the right of the aiming point, then the sight should be moved up and to the right;
Below and to the right of the aiming point, then the sight should be moved down and to the right;
Above and to the left of the aiming point - the sight should be moved up and to the left, respectively;
Below and to the right of the aiming point - the sight should be moved down and to the left, respectively;
To the left of the target - you need to move the sight only to the left;
To the right of the target - you need to move the sight only to the right;
Above the target, you need to move the sight only up;
Below the target, you need to move the scope only down.
You may need to make several adjustments to your scope to achieve accuracy. A little patience and you will learn to aim and hit exactly in the center of the target.
Withdrawal of the bowstring and stretching
Withdrawal of the bowstring and stretching - important elements execution of a shot, providing stable marksmanship, which very often beginners do not pay due attention to.
The main thing is to release the bowstring smoothly, relaxed. If you are shooting without a release, then you just need to relax your fingers to release the bowstring.
If you are using a mechanical release, gently press the button without hitting it in any way.
Practice until you don't have to worry about keeping your aim while descending - that will come with experience. Regardless of the method (manual or with release), work through training and bring to automaticity the skill of releasing the bowstring in the same way from shot to shot.
After the bowstring is released, allow the body to continue the natural movement started when the shot was fired. Continue to build up pressure on the bow handle in the direction of the shot with your left hand (if you are right-handed, or right if you are left-handed) and pull back with your right (respectively left if you are left-handed). This inertial movement after the shot is called stretching.
During the draw, it is very important to continue the movement of the "trigger" hand back in order to correctly finish the shot.
In addition, it is also necessary to accompany the flight of the arrow with the eyes, i.e. continue to focus on the target even after the shot. Practice reaching and following the shot with your eyes, this will help develop accuracy.
4. BOW TUNING
Once you've mastered shooting technique and projectile preparation, you're ready to fine-tune your bow. The best way settings - this is the so-called paper test. This test gives a clear picture of what happens to the arrow in flight. Shooting through a sheet of paper, you will immediately see any deviations and can eliminate them.
To carry out this test, it is necessary to hang a sheet of paper on the frame in front of the target. You can use any paper you have on hand, such as newspaper or writing paper. Stand at a distance of 1.5-3 m from the frame with paper. Carefully following the technique of the execution of the shot, release the arrow through the paper. An arrow hole will show any deviations in its flight. Ideally, the hole should look like a bullet hole. If the hole is larger than 15 mm, adjustments are necessary.

Rice. 11. Paper test.
For example, the fletching of an arrow entered the paper above and to the left of the tip, in which case we must make the following adjustments.
Let's start with compensation for vertical deviation. You should make one adjustment at a time, and then fire a control test shot in order to clearly monitor the result of the adjustment.
In our case, the arrow socket should be moved down to compensate for the vertical deviation. If the arrow was going down, the socket should have been moved up. It is recommended to move the boom socket in 3mm increments per setting. Take a control shot and see how the arrow trajectory is aligned vertically. Sometimes it is necessary to carry out adjustment in several stages in order to achieve the desired result.
Having got rid of the vertical deviation, you should proceed to adjust the horizontal deviation. To correct for horizontal deflection, you will adjust the position of the bow grip and arrow rest. If your bow handle has an adjustable grip and an adjustable arrow rest, you should start by adjusting the grip. To compensate for the boom deflection to the left, move the overlay also to the left, if - to the right, then to the right, i.e. the lining should be displaced in the direction of the hole defect. You should immediately move the pad to the left to the limit to determine if there is enough travel at the handle pad to compensate for the deviation. If the hole then shifts to the right, make a small shift to the right to return the trajectory to the center.
If the boom still yaws to the left even after the pad has been moved all the way to the left, then the pad offset cannot be corrected and you can move on to adjusting the boom shelf. To adjust the shelf should be transgressed immediately if the bow has an unregulated grip pad.
When deviating to the left, you should move the shelf to the left, to the right - to the right. Just like adjusting the pickguard offset, it can take a few steps and a few control shots before you get the "bullet hole" effect out of your bow.
5. CONCLUSION
It is not so difficult to learn the basics of archery even on your own, and even more so under the guidance of an experienced trainer. However, sustained marksmanship requires long hours of practice. Once you master the basics of shooting, there are plenty of ways to enjoy the sport. Thousands of archery enthusiasts do not hunt and never compete. They are quite happy with the opportunity to indulge in their favorite pastime in nature or in special clubs. They shoot purely for fun. No wins or losses! They shoot because they love the sport and enjoy the process of shooting. Archery has become an integral part of the life of a mass of people in many countries. The number of fans of this sport has increased significantly over the past ten years, with almost 50 million people practicing it in the United States. It is also an opportunity for family leisure. Agree, this is great for rallying family ties, when the interests and hobbies of children coincide with the interests and hobbies of parents, and maybe even grandparents!
If just entertainment with archery does not satisfy your ambitions, then at your service are many open regional and federal competitions held by the Russian Archery Federation, and many international competitions held in various countries have an open status. Information about these competitions can always be found on the Internet.
If you are attracted by the adrenaline of sport hunting, then you can take appropriate tours to countries where such hunting is allowed. Unfortunately, in Russia, hunting with bows is still prohibited and mistakenly classified as poaching. The arguments of the unfortunate defenders of this state of affairs are not clear. Like, this hunt is silent and the wounded animal can hide and then die, and the hunter will not find it. Firstly, for a successful shot, the hunter needs to sneak up, or let the beast come up for a shot, i.e. at a distance of up to 40 m. And there can be only one such shot! A miss and the beast will leave, and the hunter will not have time to reload his bow and aim again. Here the hunter with the beast is almost on a par. Agree that it is fairer. It should also be borne in mind that this hunt is already 30-40 thousand years old, and it was banned in our country, while with sniper multi-shot carbines, and with powerful optical sights that allow you to see every eyelash of a deer’s eye even at night, and from a distance of a kilometer , yes, on the bait area - please, you can! The bow was probably the first mechanical device created by man, the invention of which helped him survive harsh conditions, especially since there were no officials at that time who could prohibit the free circulation of bows and hunting from them, and if they were, then they would certainly would be eaten by their own tribesmen for this. Let's respect thousands of years of tradition. AT State Duma, according to our information, a proposal is brewing to allow sport hunting with bows. Many deputies and high-ranking officials would like to hunt with a bow themselves, and, probably, they are already hunting. This trend is encouraging.
But for now, hunters have at their disposal the most popular type of practice shooting today - shooting at three-dimensional targets. At these shooting ranges, archers compete in shooting at foam plastic mock-ups of animals.

Rice. 12. A hunter's trophy with a bow.
Thousands of people in our country are engaged in archery solely for the sake of pleasure. Many of them are engaged in shooting without leaving their dachas. Archery has become a family sport for them, they have fun shooting with friends. Some shooters invent shooting games such as tic-tac-toe, shooting balloons, and more, as long as your imagination is enough.
Archery is a sport that can bring joy to anyone, of any age. Many of the best shooters in the world are women.
People with disabilities physical abilities can also realize themselves in this sport, and not only as amateurs. Many of them are established tournament professionals and successful hunters. In a word, archery is a lot of fun, new friends and an opportunity to discover new talents in yourself.
So you start right now with a visit to a specialized store, take the first step in new world most exciting sport.
Let's start with the fact that I still bought my beloved wife the promised compound bow. The desire to get our hands on a real weapon, and not an entertainment one, appeared after last year's trip to Tunisia, where we managed to shoot a little with a regular resource bow, this was described earlier.
Well, this summer we are active, every weekend we go out into nature to shoot with pneumatics and crossbows. True, crossbows in our case are extremely inaccurate weapons (apparently, you need to shoot from them and, most importantly, you need to hit, oh, how long to learn), shoot from air rifle- too simple (although interesting), and the onion is, damn it, not just exotic - it is good workout and great vacation.

Of all the variety of bows available in the St. Petersburg sale, I settled on the Predator model sold under the Interloper brand, in short, this is the only serious compound bow with a price of 13,500 rubles, from which they can also shoot as entertainment (pulling force 13 kg), and, in case of urgent need, even hunts (the bow has an adjustable tension force of up to 27 kg)
In the presence of other models of compound bows (imitated by American manufacturers), the Predator model is distinguished by sufficient simplicity (like a Kalashnikov assault rifle) and reliability.
In general, the choice was made and the bow itself was bought.
I was recommended to immediately buy arrows for a compound bow (the price of one arrow is 300 rubles, length 80 cm), but I bought the simplest, wooden arrows ahead of time (100 rubles apiece, length 69 cm). When asked by a consultant why you can’t shoot cheap wooden arrows from a compound bow, but you need to buy expensive plastic arrows, as an answer I received information about the difference in the length of the arrows and nothing more.
Based practical use, with our inability (on this moment) to shoot accurately, buying 10 wooden arrows is the best choice (for the duration of the training), and by the way, the length of the wooden arrow is sufficient for firing from the Predator.
I also immediately bought a case for carrying a bow, of course, black, and not defiantly camouflage - we are modest people, we don’t need extra attention to anything.

I didn’t write about the most important thing! If you do not want to break all your arrows after the first shot - buy a special target for bow and crossbow arrows. It is made from a mixture of plastic and polystyrene, a kind of foam block, the minimum size of 50x50cm costs 1,500 rubles.
This target is a must buy if, again, you don't want to break all your arrows after the first shot.
The weather in the morning was great and we went to shoot not in a car, but on bikes. Carrying a target with you is not convenient, my wife immediately came up with a special sling just for transporting the target. (It took about 30 minutes to make the bandage along with the purchase of materials).

We were extremely arrogant and set the target at the level of the chest of a person (right on the bike) and shot from 12-15 meters.
This is where the most interesting things began.
1. Compound arrow flies very fast
2. With the right tension and aiming, the bowstring hits the arm very painfully.
3. Getting into a 50x50 cm square from 15 meters with a bow is not easy
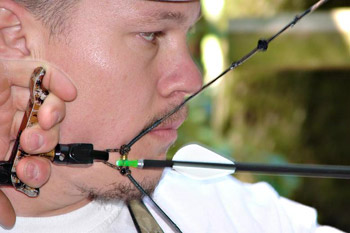
How to aim correctly:(relevant for classic bows)


The arrow should be at eye level, as shown in the photo.
How to aim incorrectly:(but nevermind, if you have a pip-site and a sight on the blocker itself, this is the most correct way)


And when you aim incorrectly, the arrow flies in a completely unknown direction ...

and finally:
Bow safety rules
Improper handling of the bow can be dangerous for the shooter and for those around him.
Bow breakage is rare and, as a rule, due to the inattentive attitude of the shooter to his weapon.
Before each shooting, it is necessary to carefully inspect the weapon for obvious signs of wear or damage to its parts. A frayed bowstring, protruding strands of steel cables, cracks on the shoulders of the weapon - these and other external signs of problems should alert the shooter. It is necessary to check the installation of the sight, the presence of screws, nuts, etc. and, if necessary, their tightening
When stretching the bow, there should be no creaking, crackling ...
Arrows in size, length, weight, stiffness must match your bow (this must be done, guided by the tables manufacturing firms arrows, minimum permissible weight arrows are also indicated on the bow itself among its other characteristics)! Shooting arrows that are too light can cause the weapon to break quickly. It is necessary to check the integrity of the tubes and arrow shanks. Shanks that snap loosely on the bowstring must be replaced. Shooting with questionable arrows is absolutely unacceptable!
An outsider, in whose hands the bow of interest turned out to be, should be warned about the inadmissibility of the so-called "blank shot" (shot without an arrow in the bow), in which AS A REGULATION the bowstring and / or cables break and the shoulders can be damaged or even broken. A stretched bowstring, in case an arrow is not inserted into the bow, must be released smoothly!
When preparing to shoot, the shooter must make sure that there are no objects in the area of \u200b\u200bthe upper and lower blocks that they can hit when straightening their shoulders. The authors had a chance to hold a bow with a crooked top block, hit by a shot on a low-lying ceiling beam. The bow cables in that case were also damaged, and the bowstring was torn.
Often, stretching the bow, the shooter forgets to put the arrow on the shelf. With such a shot, the arrow hits at a distance of 1-1.5 meters to the right and up to 1 meter below the target (when shooting at a distance of 18 m). At a minimum, the shooter loses 1 arrow from his arsenal, despite the fact that such a miss can be dangerous for objects located next to the target shield.
Speaking of arrows. You need to carefully remove the arrow from the target shield, grabbing the tube from the shield and gradually intercepting it with your hand. When extracting an arrow, it is important, firstly, not to bend it, and, secondly, not to injure a person next to you when the arrow is abruptly pulled out of the shield.
Archery training. The archery section of our website contains information about almost all well-known archery clubs and sections in Moscow and Russia. If you have information about the existence of a section (club) that is not in the list, you can add it. Choose the right place for archery. In most sections, archery classes for children are free. Sets of children and adults in the section usually take place at the beginning school year(September), but most coaches continue to accept newcomers throughout the year. In sports schools, as a rule, beginners are given a bow for beginners, arrows and the necessary equipment. In extreme cases, you can buy a bow for shooting in numerous online stores selling bows, crossbows and related products. The cost of a bow for a beginner is about 3 thousand rubles. Join. Just one word of warning: Archery is a very addictive sport, it can drag on, and for a long time ;-)
NEWS section in the world of archery. This section constantly publishes news happening in shooting sports, opening of new sections or clubs, competitions, archery tournaments, changes in the competition rules, interviews with coaches and archery athletes and much more. You can publish your announcement (article, news) about an upcoming (or past) competition, tournament, or other event. Please indicate the coordinates of the organizers, the date of the event, the place, etc.
Archery - olympic look a sport in which athletes compete in archery accuracy. The winner in archery is the athlete or team that scores more points, according to the rules of the competition. Archery competitions are held between both men and women.
History of the origin and development of archery
It was not possible to establish the exact time of the appearance of the bow, as well as the places of its appearance. It is known for sure that people used bows at the end of the Stone Age and used them for hunting as a weapon. Thanks to onions, people were able to get their own meat food.
About 3 thousand years ago, the bow began to be used not only for hunting, but also as a weapon. Archers were greatly appreciated, as they could hit targets several hundred meters away. Later, bows were replaced by firearms, and it was during this period that sports archery began to develop.
In 1900, the first official archery competitions were held, and this happened on the second Olympic Games. Until 1972, this discipline was considered optional, in some years it was included in the program of the Olympic Games, but in some it was not. Despite the competition, there was no governing body for archery. International Federation archery (FITA) was created only in 1931 in Poland, and she subsequently developed the rules for the competition.
In the mid-eighties, duels were introduced, which were supposed to increase the spectacle of the competition. In 1988, team competitions were added to them. Since 2000, the rules of archery have been constantly changing, and every Olympic Games are held with changes in the program.
Archery Rules
Archery competitions are held as outdoors, as well as indoors. Shooting at competitions is carried out in series of 3 or 6 arrows. According to FITA standards, a series of 3 arrows is given 2 minutes, and a series of 6 arrows is 4 minutes.

At all competitions, qualification is first carried out, and then, among the remaining athletes, according to the Olympic system, the winner is played. This system is also relevant for the World and European Championships.
Archery is fired at FITA approved targets. Archery targets are made of paper with concentric circles of different colors depicted on it. Targets are attached to special shields, which are made of durable material that prevents arrows from passing through. The size of the target depends on the competitive distance. Inside the "ten" there is another circle of half the diameter, it is necessary to resolve controversial situations of equality of points and to fix world records.
archery distances
Indoors, shooting is carried out from distances of 18, 30 or 50 meters (for men and women).
Outdoor target distances are 30, 50, 70 and 90 meters for men and 30, 50, 60 and 70 meters for women. At the Olympic Games, archery is only carried out from a distance of 70 meters.

Gear and equipment
The main element of the equipment, of course, is the bow. On the official competitions Under the auspices of FITA, two types of professional bows are used in target shooting:
- Shooting from a (traditional) classic bow (recurve bow). The pulling force of such a bow is about 15-20 kg. The speed of the arrow reaches 240 km / h. This bow is used in the Olympic Games.
- Compound bow shooting. In such bows, a special mechanism is used, which provides the arrow with more correct acceleration, and also facilitates the process of drawing the bow. Tension force is about 25-30 kg. The speed of an arrow from such a bow reaches 320 km / h.
A fully equipped bow usually weighs between three and a half and four and a half kilograms.

Modern sports arrows are composite (tip, shaft, shank, plumage). For archers, the fit of arrows is very important. They must satisfy a lot of individual qualities, primarily the length of the arms. Arrows are stored in a special arrow quiver.

A release is a trigger. With it, the archer grabs the bowstring, and then, in right moment releases her. The release minimizes the grip area of the bowstring, which in turn reduces bowstring deformation at full draw and thus increases shooting stability.

An archery gauntlet is a bracer that protects the archer's forearm from being hit by a bowstring.
